
Tim Mortimer - A Mangle Conversion - a Lockdown Project
CONVERTING AN OLD CAST IRON MANGLE INTO A PRINTING PRESS
Not really a woodturning project now is it, so why and how did it all start?
Well, I have a fairly large workshop which is in fact a double size stable with no internal partition wall and a tall apex roof with no ceiling. There is an old wood burner in the corner but from mid-October onwards I'm lucky to get the temperature up to 15°C, well from the rafters down anyway. To be honest, I
don't function very well in temperatures below 23°C so I had to find a hobby that I could do indoors in the winter. In short, that's how and why I ended up trying my hand at linocut printing. The final process after carving the Lino is, of course, to print the end result and there are several ways of doing this; the easiest being to use a roller style printing press. The downside is that a good one will set you back several pounds with lots of noughts on the end and that's far too much money for someone just trying out a new hobby.
Well, I'm sure you've figured out my next step by now and those of you who aren't completely Covid brain dead by now may just have spotted the clue in the title!
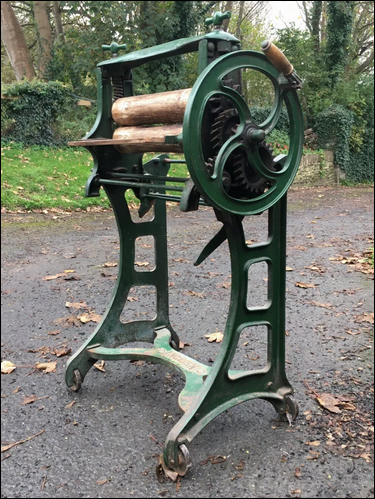
After researching online I found a few articles by people who had actually carried out successful mangle conversions. So the search began to find an old fashioned cast iron mangle, you know, the type that many of us remember winding the handle on for our mums in the distant past. Anyway, in November last year after returning from visiting relatives in Devon, I found one on eBay. It was fully functional with gear wheels that turned and had no broken cogs but guess where it was? Yep you got it, down in Devon about 5 miles from where we were the week before - now what's the name of that law again? I eventually picked it up early in the New Year and off loaded it into the workshop where it sat for several months in ‘Lockdown’, while I worked up some enthusiasm to start the project and waited for the temperature in the shop to become bearable again.
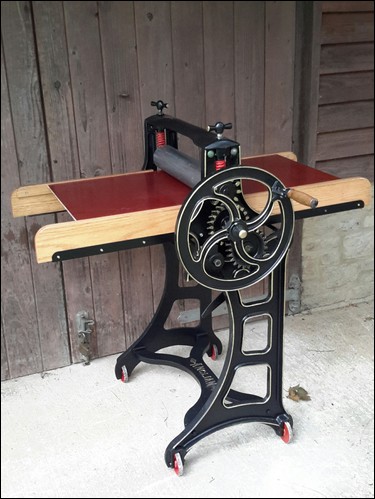
The project itself was quite straight forward really, strip down the mangle, clean and repaint all the bits, make and attach a print bed, reassemble and carry out a proof print run.
Unfortunately, the old wooden rollers were badly worn with a 12mm gap in the middle caused by years of mangling laundry so onto the lathe they went to be turned parallel again. I then sleeved them with some 5mm thick steel tubing that I managed to 'rescue' on one of my trips to the Purton Recycling Centre. The print bed, which moves along the wooden runners when you turn the handle, takes an awful lot of pressure and needs to be both strong and rigid. Most are made of 5mm thick steel plate but I thought I would try some 6mm Paxolin (Tufnol to you Harry) which I'd kept for the best part of 30 years just waiting for the right job to come along. I've actually got a separate shed half full 'bits and bobs' that might come in handy one day, you know how it is don't you! Anyway, the Paxolin/Tufnol worked very well and slides easily with little friction along the runners. I did have to buy 3 meters of 25mm angle to support the bed runners though.
Now, when I carve a linocut drawing I glue the Lino, which is around 3.5mm thick, onto a piece of 12mm plywood for stability and this makes the complete printing block around 15.5mm thick. Unfortunately, when you add the thickness of the printer bed, your paper and a layer of 5mm felt to even out the pressure from the top roller, there is no way you can lift the top roller high enough to allow everything to pass underneath because the springs are fully compressed. The answer is of course quite simple, use shorter springs. So, I ended up buying two strong die set compression springs which were near enough the same diameter as the originals but around 25mm shorter and they worked a treat. There is now plenty of room between the print bed and top roller and I can easily increase the pressure by adjusting the spring tension, just like mum did to get more water out of the washing, truly amazing!
Just one slight problem to overcome and that was how to raise the top roller onto the printing block and stop it falling off the end of the block with a bloody great bang when it rolls through at the end. Again another simple solution was to use a set of rails either side of the printing block. These sit on and run the length of the print bed and are about the same thickness as the print block. They have a 75mm taper at the end like a ramp so the top roller can climb up gradually when you wind the handle. The rails can be seen in the next picture and if you look carefully you can just see a little of the white backing felt behind the print on the bottom left. You can also see the new red tension springs and the original 'T' handle adjusters on the top.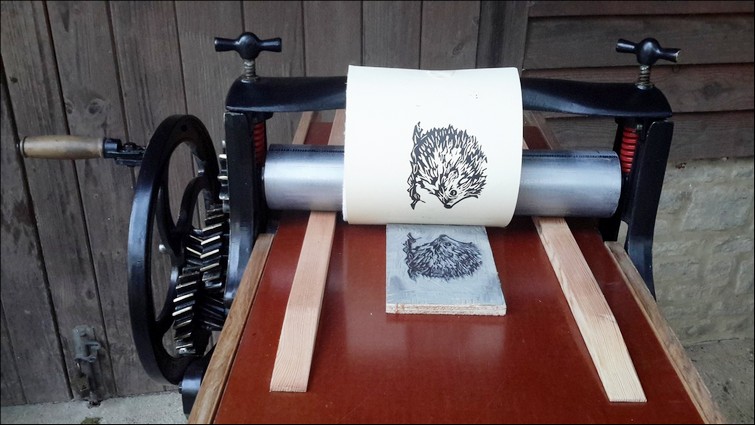
So, there we go project completed, I reckon it cost me around £90 in total including the mangle, springs, angle iron and paint so I was well impressed with that (no pun intended right Arthur!) and indeed with the end result of the proof print.
Ah, I forgot, there is just one more problem and that is where to keep the finished press. I thought it would look quite nice in the hall, a bit of industrial nostalgia is still quite trendy I'm reliably informed. The problem is that Home Command was not quite as enthusiastic as me and even less impressed when I suggested that we should be doing our bit to save the planet and consider going green. "How" she said. “Well, by replacing the spin drier with a newly renovated hand driven mangle of course” said I. Hmm, lead and balloons come to mind and something tells me it's now destined to stay in the workshop for a long time!
Well at least that's helped to prioritize my next project which is to divide the workshop with a removable paneled wall which I can take down when I need the extra length to build my kayaks and also to put up a ceiling in one half of the shop. Hopefully when finished, with the wood burner stoked up and all the heat not vanishing into the rafters, I will be able to crack on with some winter woodturning when I'm banished to 'the shed'.
Take care everyone and let's all hope the biologists come up with a vaccine soon and things get back to near normal. Until then just remember that 6 feet apart is better than 6 feet under!
Tim Mortimer - 17th September 2020