The Lockdown Projects - Page
7
We may have expected these Lockdown Project
Pages to be short-lived and merely a way of seeing what our fellow Club Members
were working on in these difficult (Covid-19) times.
Page 1 of the Lockdown Projects was published in May 2020 - and here we
are in December 2021 with Page
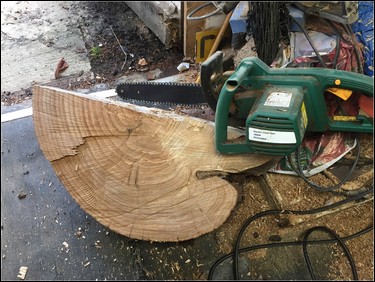
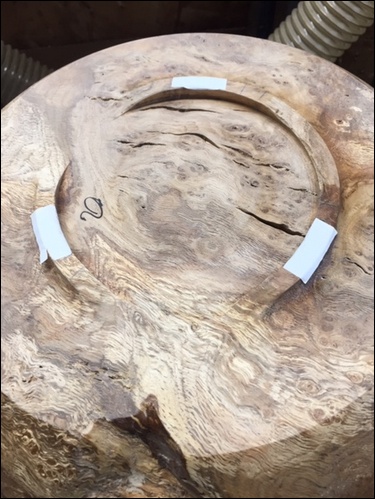
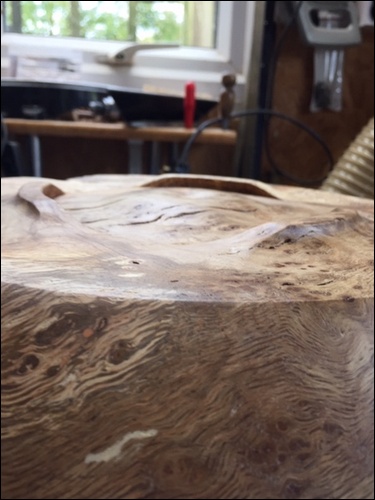
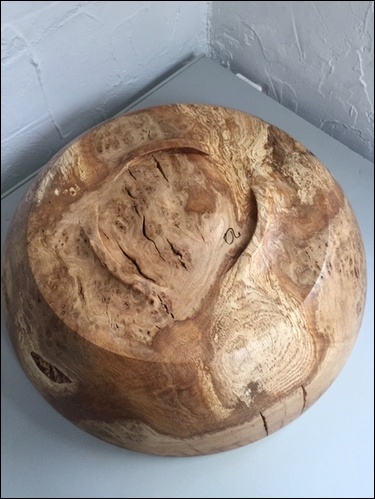
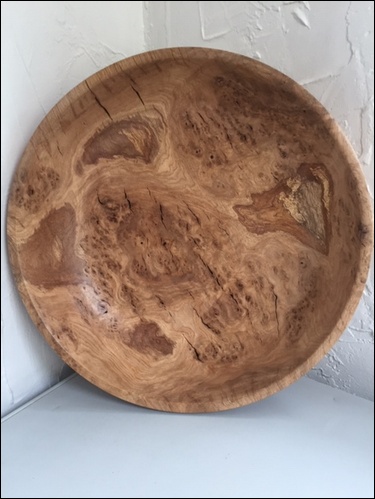
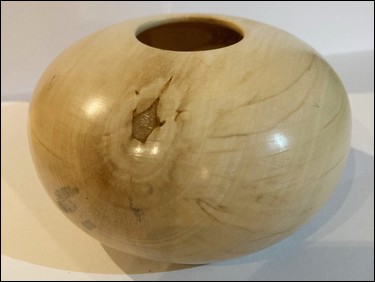
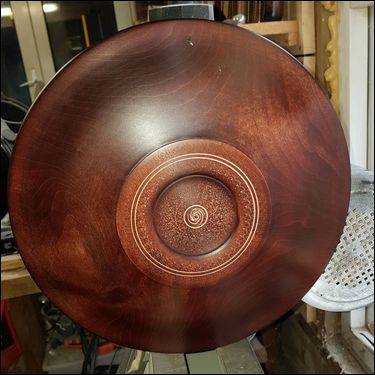
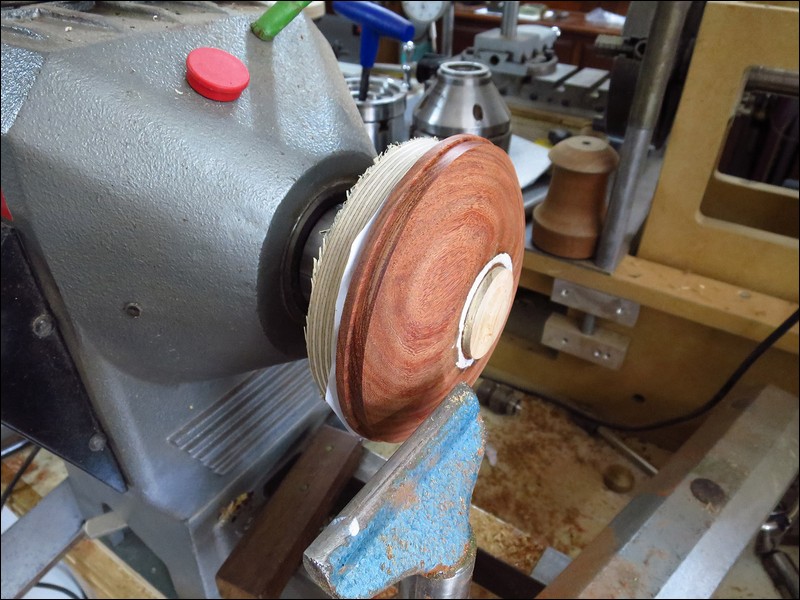
7. 😀 Ken Gateley has been working on a large
Burr Oak bowl with a 3-lobe, carved foot. After finish turning the
inside and outside of the bowl - Ken laid out the base (ring) for
three equally spaced feet. He then roughed out the feet with a
Proxon electric carving tool and finished the shapes to blend, by
hand sanding.
On this page there will be displays of work created by Members whilst on lockdown. These are the 'Lockdown Projects'. This is the equivalent of the 'display table' from Club nights. This is Page
7 of the projects - click HERE to display Page 1,
HERE
to display Page 2, HERE
to display Page 3, HERE to display Page 4, HERE to display Page 5,
and HERE to display Page 6
<Top of Page>
The bowl is 15.875" diameter by 4.5" tall (400 mm by 115 mm) -
finished with microcrystalline wax.
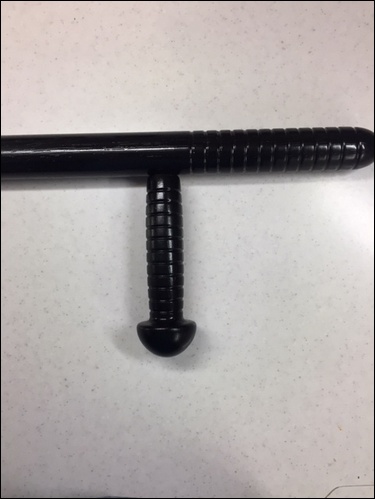
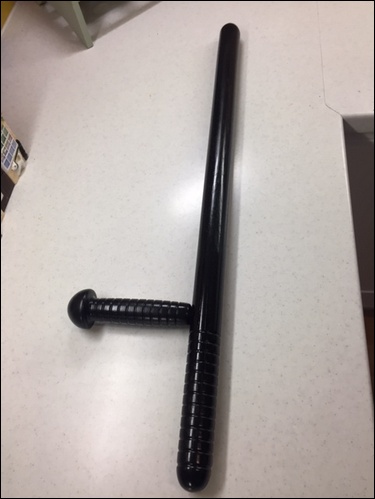
Ken has also been spending his time making a 'lethal
weapon'.
He was asked by a friend if he could reproduce in wood, a copy of a
plastic 'American side handle police baton' - and make it 2-inches
longer. The friend has purchased and imported an old American
police cruiser - that has a 'weapons holder' between the front seats
and wanted something a little more authentic than the plastic
version.
This is the result - made of ash, in two-pieces - main baton and the
side handle. It measures 26 inches long by 1.375 inches diameter.
The side handle is 5.5 inches long with a stem diameter of 1.125
inches and the ball on the end is 1.75 inches diameter. There are
multiple grooves cut into the end section and the side handle to
resist slippage when in use…
It was finished with cellulose sanding sealer, ebonising spray and
then gloss lacquer spray.
NOTE: It was finally, thoroughly scrubbed all over with medical
disinfectant wipes to remove all traces of DNA and Ken's
fingerprints - prior to hand-over. 😊
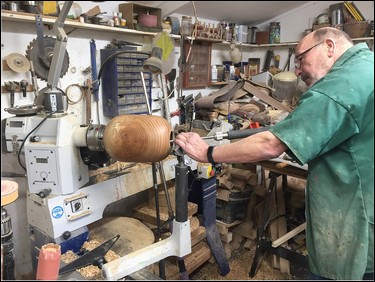
Martin Barrett
has been very busy recently - whilst carrying out a major revamp of
his kitchen and re-building his workshop, he has also been working
on multiple projects on his lathe.
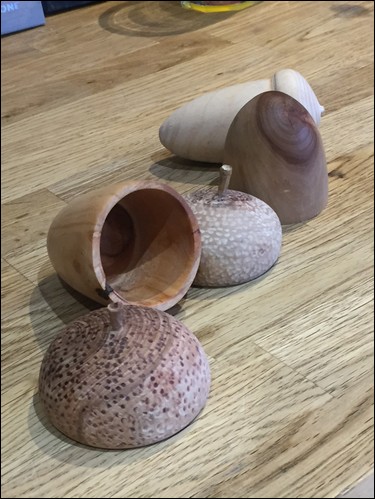
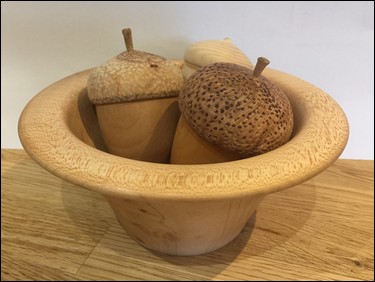
Starting with some small acorn boxes, with a decorated cap and stem
for the lid - made from apple tree branch trimings. These are
displayed in a small ash bowl.
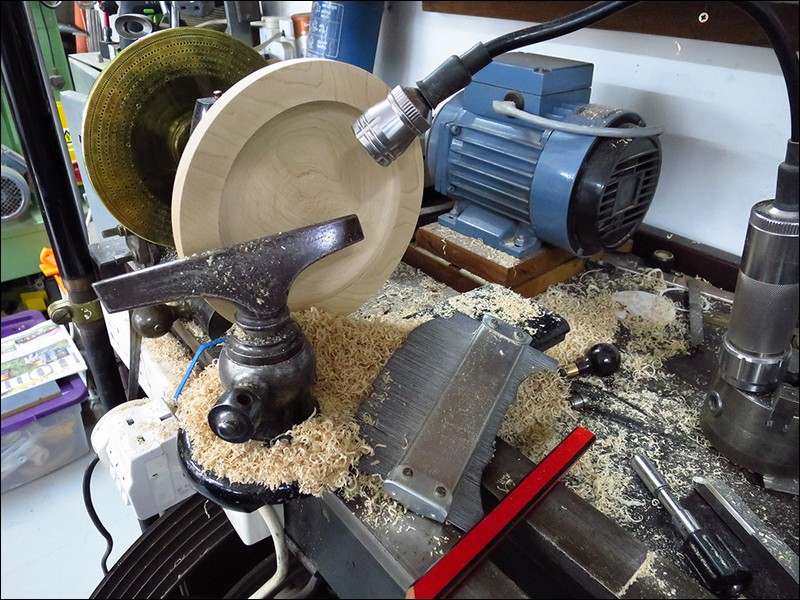
Martin has been experimenting
with hollowing and was pleased with this first, second, third effort
- which he regards as 'just a practice piece'. The timber used was a
small silver birch log (very dry) rescued from the firewood pile. The completed bowl is 110 mm diameter by 65 mm tall - finished with
cellulose sanding sealer and Hampshire Sheen wax.
This is followed by a bunch of
hedgehogs - scorched with a blow torch and re-turned and some (as
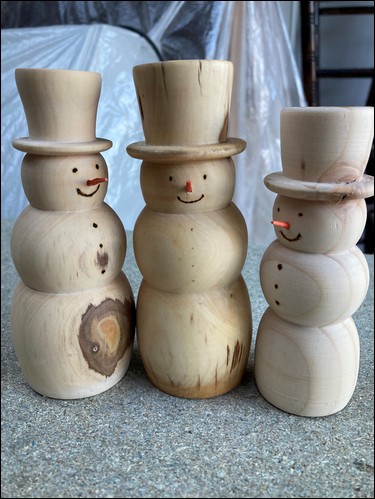
yet unpainted) Christmas Snowmen - also made from sections of the
old oak kitchen worktop.
NOTE: A group of Hedgehogs is actually called an
'Array' or a 'Prickle'
(who knew?)…

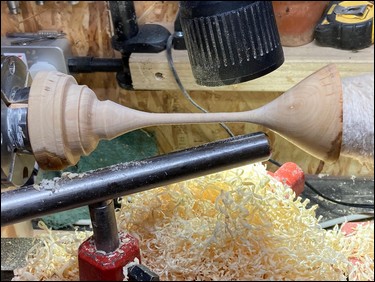
The long stem goblet is made
from apple wood - not the best piece of timber (splits) - but,
Martin was happy to use it as practice. The top of the rim is 65 mm
diameter and it will stand at around 150 mm tall once the base is
finished to its required thickness.

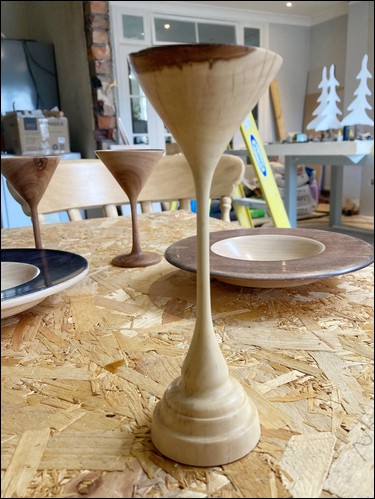
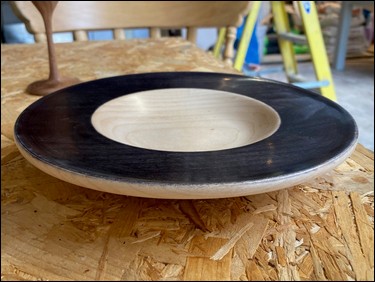
The shallow bowls are both made from
maple - turned and stained with Hampshire Sheen products - and
finished with wax. The 'blue' bowl is 215 mm diameter by 35 mm tall
and the 'bronze' one is 212 mm diameter by 38 mm tall.
Martin made these snowmen in response to a Richard Findlay Instagram
'skew challenge' in which he demonstrated the techniques, and then
asked people send-in their efforts using only a skew.
He also provided a downloadable pattern for people to use.
Martin commented: "I found it a great way of using a tool I don't
use very much - especially to create a turned item."
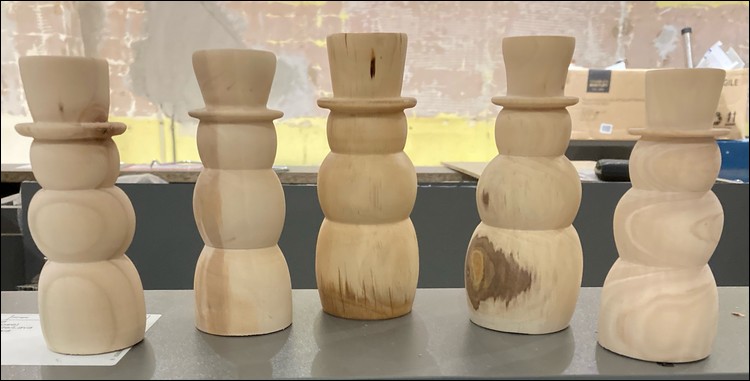
The timbers used were offcuts
of pine, popular and apple tree limbs. Average sizes are 125 mm tall
with a maximum diameter of 50 mm at the base. The face and
buttons are via pyrography - and the nose is a small art type stick,
painted orange.
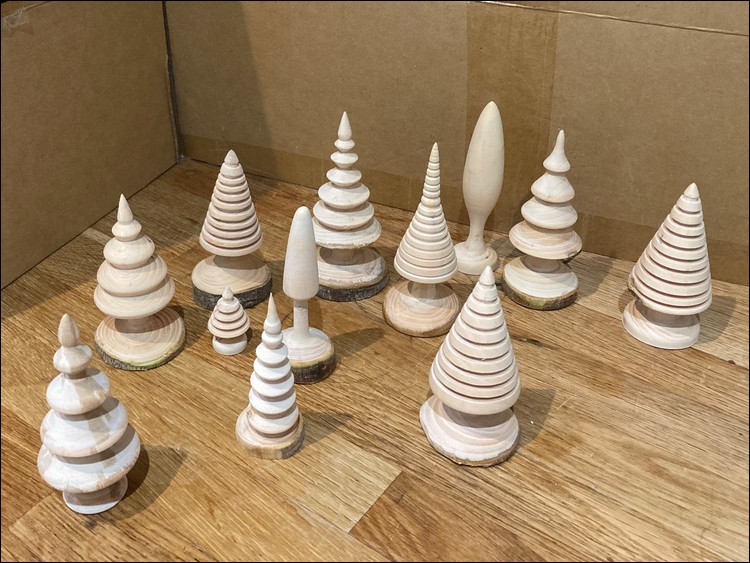
Finally, a forest of 'Christmassy tree' shapes - just for fun! - made
from apple tree branch cuttings.
Apart from his woodturning - Phil Lawrence
is an accomplished knife maker. Here are some details of his latest
and some of his earlier projects.
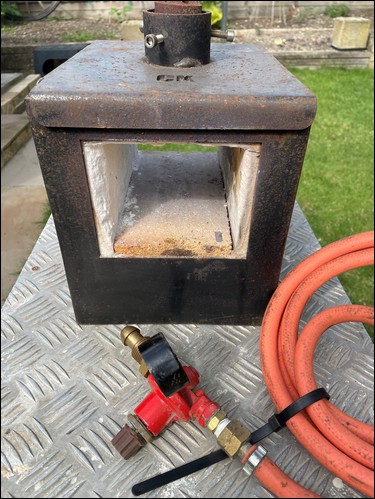
First of all - some of the equipment Phil uses:
A small propane gas fired kiln is used to heat the steel up very
quickly, to a critical temperature of approx. 800 degrees
Centigrade, before quenching in oil and then tempering.
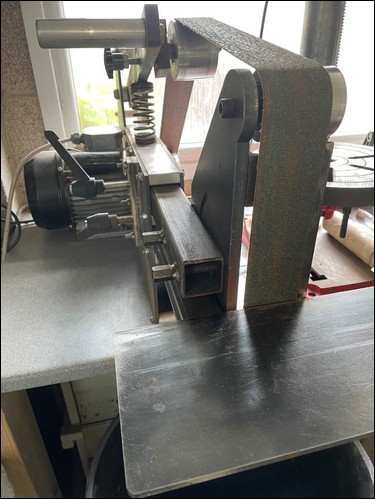
A belt sander (the belt is 72 inches long by 2 inches wide) - is
used for initial shaping of the knife blade using a 60 grit belt -
which removes metal at an 'amazing' rate!
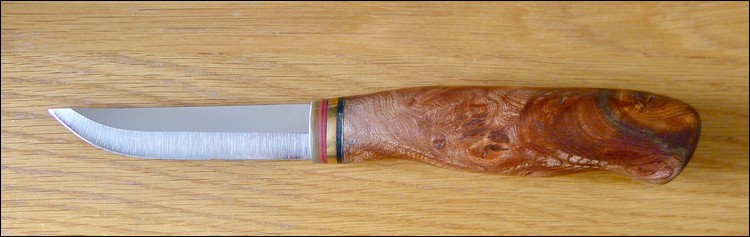
This is a Scandinavian Puukku style knife (a small traditional
Finnish general purpose belt knife, with a single curved cutting
edge, solid hidden tang, and usually, a flat spine). The knife is
225 mm long and the handle is a burr wood.
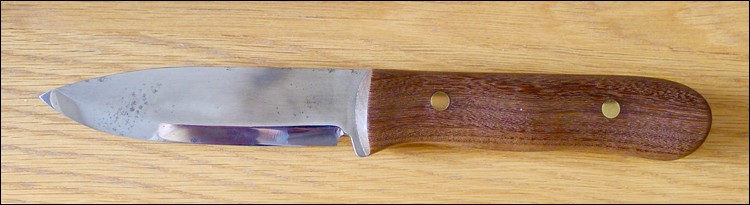
Unfortunately, this Bushcraft style knife has suffered from some
minor discolouration on the blade over the years - which remains
razor sharp. The knife is 225 mm long and the handle is a burr wood
- if anyone can identify the timber species, give Phil a call (it
was purchased a while ago…).
Both of these knives are made of O1 steel and hardened and tempered
to approx. 59-60 Rockwell.
Technical Info: O1 (that's a letter 'O' and a
numeric one) is a popular steel for knives (in fact, a favourite
with knife makers), with qualities such as high hardness, excellent
wear resistance, high toughness, high polish performance, and great
edge retention. Its only weakness is poor corrosion resistance due
to low chromium content.
O1 Tool Steel is the original oil-hardening, "non-shrinking" tool
steel that can be hardened to the Rockwell C 65 range from a low
austenitizing temperature. O1 is a general-purpose tool steel that
is typically used in applications where alloy steels cannot provide
sufficient hardness, strength, and wear resistance.
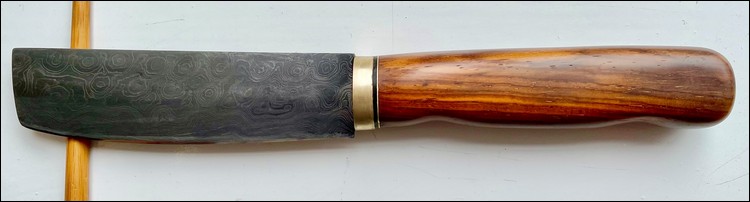
This is Phil's latest project.
It is a Nakiri - this characteristic Japanese rectangular blade shape
is optimised for vegetables. Its thin, double-bevel blade slices
easily and its large surface can be used to scoop up food. Phil made
this knife for his wife, who has small hands, hence the size is only
an overall length of 9 inches (230 mm).
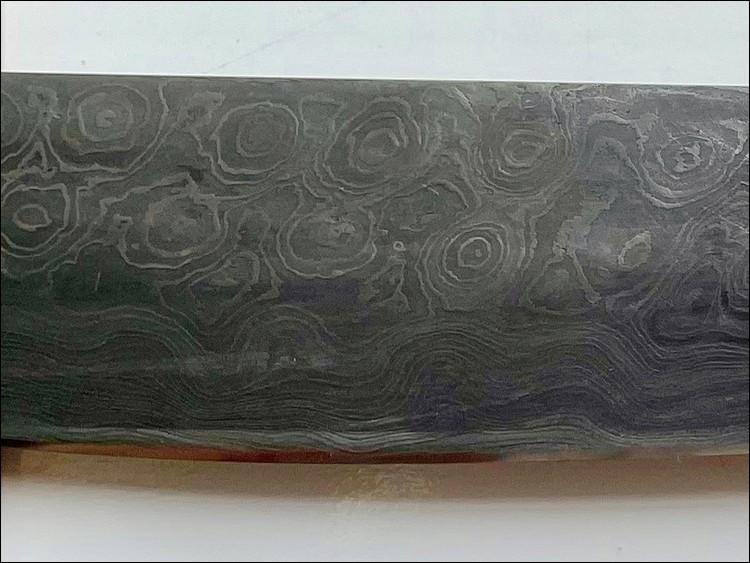
It was made from a billet of 64-layer Damascus steel, annealed,
ground to shape, hardened and then tempered to around 60 Rockwell.
The blade was then dipped in Ferric Chloride (which etches the
blade), to bring out the Damascus design (see final photo).
The bolster (which separates the blade from the handle), is
hand-made from brass. This is quite a finicky job - which entails
lots of hand cutting, filing and polishing. The handle is Cocobolo,
which was hand shaped and sanded to 1000 grit - affixed to the blade
with epoxy resin.
The bevel edge was set using a 1500 grit stone and finished on a
leather strop, charged with Chromium Oxide and is now razor sharp!
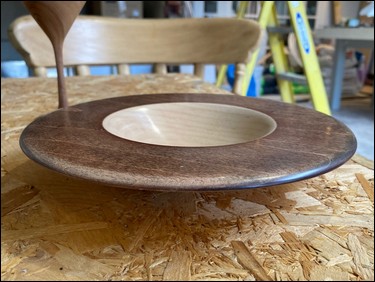
Robert Duffy has been busy in his workshop and has produced
two large decorated platters.
The first one is in walnut and measures 235 mm diameter by 45 mm
tall - the rim of the bowl is approx. 13 mm wide.
The underside of the bowl has been extensively textured using the
large Sorby texturing tool.
Finished all-over with cellulose sanding sealer, and Chestnut
Cut'n'Polish abrasive wax, followed by the application of
Microcrystalline wax and then buffed with carnauba wax.

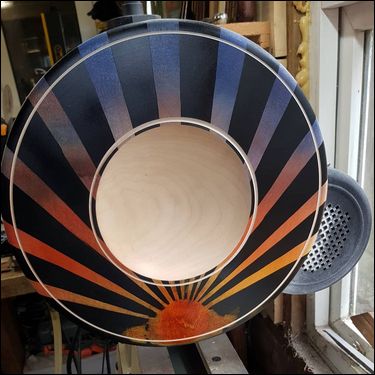
Robert's second bowl is a "Firstlight/ Sunrise Bowl". This was
heavily influenced by a Chestnut/ Conkers demonstration he saw,
presented by Darren Breeze (see:
https://breezewoodturning.com )
The timber used was sycamore and measures approx. 260 mm diameter.
All of the coloured stains, waxes and lacquers etc. are from
Chestnut Products. The final finish is gloss acrylic spray and
burnishing cream. Robert says that cutting the masking tape to size
used for the 'sunrise' was a 'bit tricky'. Crisp straight lines and
careful placement were needed - this was aided by first of all
placing the uncut tape onto waxed cooking paper - then measuring and
cutting accordingly.
The back of the bowl has a mixture of red, orange and black stains
applied - textured with the Sorby large texturing tool.
This was a very enjoyable and satisfying piece to make!
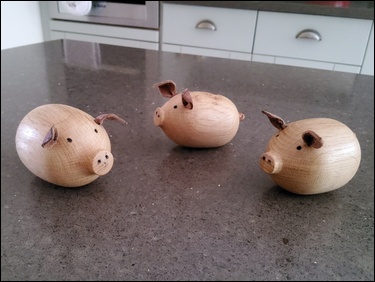
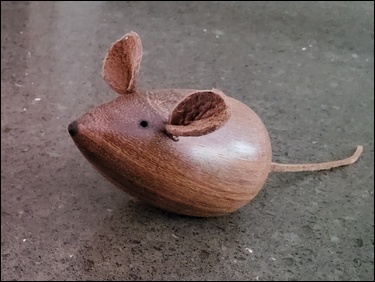
Tim
Mortimer has been exercising his creative skills with the
production of some 'pigs' and 'mice'. Both creatures have leather
ears, pyrography for the eyes (soon to be replaced with black,
glass-headed pins) - and the pigs have a 'tail' made from a short
section of curled copper wire. Very cute 😊
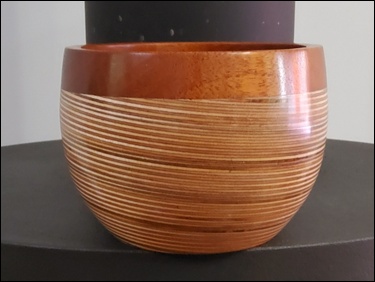
The two hollow pots are approx. 5" diameter by 7" tall and 5"
diameter by 5" tall. The pots are made from 19 mm thick birch
plywood - cut, stacked, glued and clamped. They were then cut at an
angle on the bandsaw prior to turning. The solid wood top sections
are made from mahogany.
Both pots were finished in exterior satin Osmo oil, left over from
when Tim made and oiled his front door about 3-years ago. He
commented that the plywood/ glue blunts the turning tools very
quickly - so he resorted to some Tungsten Carbide insert tools, he
made some time ago, to hollow them out.
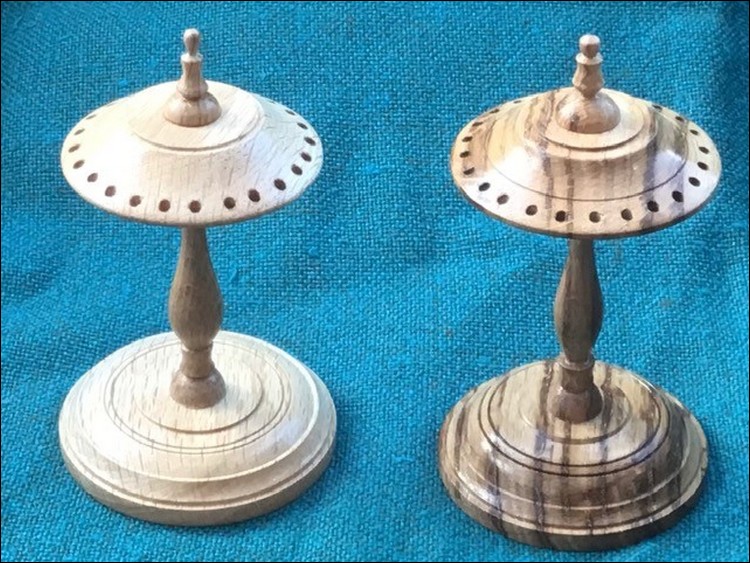
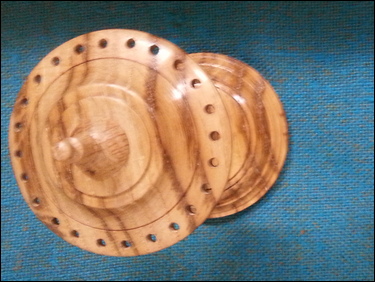
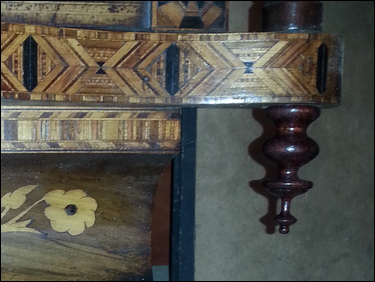
Vernon Hughes
has provided detailed information and photos on his thinking and
progress on his latest project. He has been working on making
earring stands for family, friends and charitable causes. He has
titled the write up "Making an Earring Stand or Several".
"Since buying a first lathe in 1994 I have never attempted to make
an earring stand; because the challenge of achieving accurate hole
positioning seemed too daunting for a mere amateur 'woodie'.
However, the wish persisted, and re-visiting the late Keith Rowley's
two books recently tipped me over the edge into making an attempt. The lighter-coloured prototype example is in White Oak, whilst the
striped one has something of a Zebrano-ish look to it, but I could
be wrong. Overall height is in the region of 5 inches. and the
circle diameters are 2.625 inches for the tops, with bases close to 3 inches. There are four components viz. base, stem, carrier tray and a
finial. The detail follows Keith's superb design closely and
includes such fine features as fillets no more than 0.5 mm height or
width in the vertical/ horizontal planes.
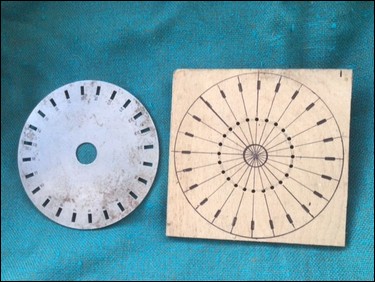
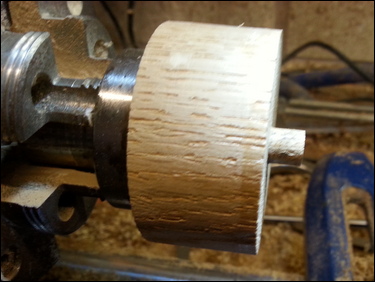
But how was the hole spacing challenge tackled? The answer is given
below in some detail in case it helps anyone else. Keith Rowley used
an engineered 24-hole metal circular jig with a 10 mm central spigot
on the underside. Luck intervened for me when, rummaging through a
drawer-full of chuck componentry, I found a forgotten 'Record'
dividing plate with (by another fluke) exactly the right number of
spaces. The plate was held firmly in place on a square of plywood
while the spaces were marked thereon through the rectangular
windows. The next job was to connect opposing windows with ruled
lines (potential equidistant diameters) aiming to hit the short
sides of the rectangles dead centre. After the first three had been
drawn a point tool was used at the crossing point to mark a dead
centre for use in describing circles, and a 1 mm hole was drilled
through, using the drill press to provide an accurate register point
on the underside. A 10 mm diameter spigot (8 mm long) was then
turned and drilled and glued to the reverse side using a fine nail
as a stabilizer. Next came the trickiest task of all - marking
exactly with a point tool, on a carefully measured circle the 24
drilling positions spaced at 2.25 inches between opposing centres;
this was followed by mounting in the drill press vice and drilling
the 24 holes with a 3 mm bit. The spigot is a key feature in the
process of drilling holes in the carrier tray. A 10 mm hole is
drilled in the centre of the 3 inch diameter tray blank which then
serves to centre it on the plywood drilling jig spigot throughout
the drilling process. Drilling those holes through the jig is a
demanding task to make sure the bit finds dead centre of each hole
in the jig and that casual damage to the jig is avoided; and after
the first hole has been made a 3 mm diameter nail is pushed into the
hole to achieve absolute stability whilst drilling the next 23
holes. The end result is satisfactory but I plan to make a second
jig to a somewhat higher standard now that a feel for the task has
sunken in.
Keith Rowley had a fine eye for detail, and making the components
close to his design has been particularly pleasing. That design can
be found in his second book 'Woodturning Projects'. It does not
appear in our Club Library list, but at least one copy is available
on-line. The project involves inter alia making a 10 by 8 mm
spigot chuck with a piece of scrap-wood on a small screw chuck for
use in holding the base and carrier tray blanks. All jolly
good fun!
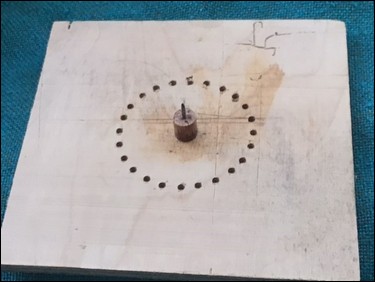
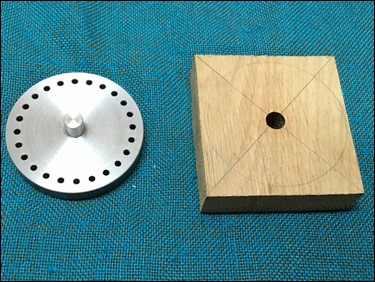
Follow-On Footnote:
Two months have slipped by since the above report was penned and the
imagination has been ticking over, driven by recognition that the
first effort in wood was capable of improvement. However, the
original intention to make a second guide in wood was gradually
replaced with the thought that it might be worth checking whether
small engineering companies exist in my area, and if so, whether any
would be interested in making a metal version. This proved to be a
perfect example of value in the old adage that "If you don't ask you
don't get". Gold was struck immediately. The first company
approached was perfectly at ease with the idea, and the price guide
was far from outrageous.
To cut a pleasant story short, and in next to no time, I became the
possessor of the metal guide shown in the photograph, at reasonable
cost; justified all the more by the fact that I hope to make a
goodly number of stands as gifts for many qualifying family members
(all female), followed hopefully by more for charity. The task will
be as reliable and straightforward for me as it was for Keith Rowley
in years gone by. The blank alongside, with its 10 mm drilled
centre-hole is approx. 3 inches square - that shape being retained
during drilling to ensure a strong hold in the drill press vice.
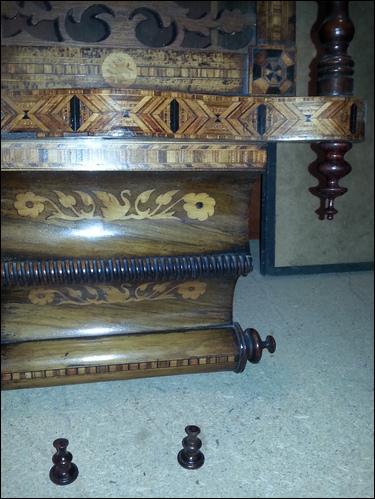
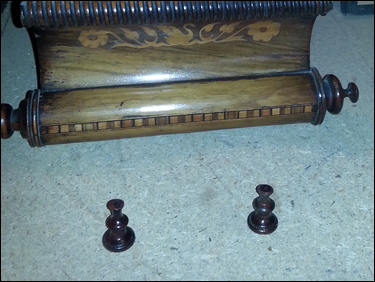
This is one of Vernon's
latest projects - making some replacement and additional 'Finials
for a Clock Case'
Vernon writes - "Some while ago a friend asked if I could turn some
components to help him restore the ornamental wooden case of a clock
that had some sentimental value for him.
On close examination it turned out that three finials were required,
one to be a copy and the other two to be designed to be in keeping
with their position on the case.
The 'copy finial' is shown in position on the right-hand side of the
case and pointing downwards.
The two smaller ones were designed to fit horizontally on the ends
of the scrolled bar. Fortunately, I had a good range of
old-fashioned spirit stains and a suitable, matching shade was hit
upon by mixing. Tasks such as this can be very satisfying due to
their practical application."
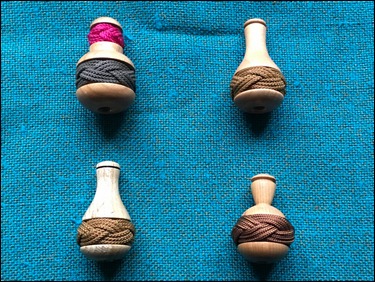
Vernon has been combining his woodturning expertise with his
knotwork skills to produce some unique light pulls - here is what he
said:
"There must still be millions of plastic light pulls in British
homes yet to be replaced by our shapely wooden ones, so it always
seems to be worth making a few whilst preaching "ditch the plastic;
switch to wood!". And they provide a good opportunity for
practice with shaping and tool management.
I have had occasion to make a small supply for a granddaughter over
recent months and have more to make for members of the knot-tying
fraternity. The photos display a method of decoration with
knotwork, in this case using 'five-bight by three-lead' Turks Head
knots. Basically, the process involves a single strand of
cord, which in this case follows round three times. The
first pass is quickly done, but the second and third take more time,
as they go under and over alternately. Then, tightening the
whole knot to make it look right and to achieve absolute stability,
takes time and patience (experience also helps…). This
particular Turks Head can be completed in about 15 to 20 minutes - I
should think, although I have never actually timed it. The
time goes in the tightening process.
There are also a fair number of other designs - basically 'standard'
and requiring much less work and time to complete.
Typical sizes are around 50 mm long by 32 to 35 mm diameter.
Two pieces of tooling are particularly helpful additions to the tool
kit when making light pulls - a drill for boring the two holes sizes
in one operation, and a morse taper spindle drive tool with stepped
diameters."

Harry began working on this project after an
invitation by Arthur Kingdon to present 'something' at the next Club
Zoom meeting.
"I had previously made 'groups' of items that were scaled in
proportion to each other. For example - make the first one and then
make a second one - but, this time make it one-inch shorter and make
everything else in direct proportion. Then, make a third one -
now two- inches shorter than the first one - with all other dimensions
in direct proportion and so on.
The calculations are actually quite simple - but, I have added a
couple of 'Ratio/ Proportion Calculators' to the Club Website
- for
the avoidance of hard sums. See here:
NWWA - Odds and Ends Page
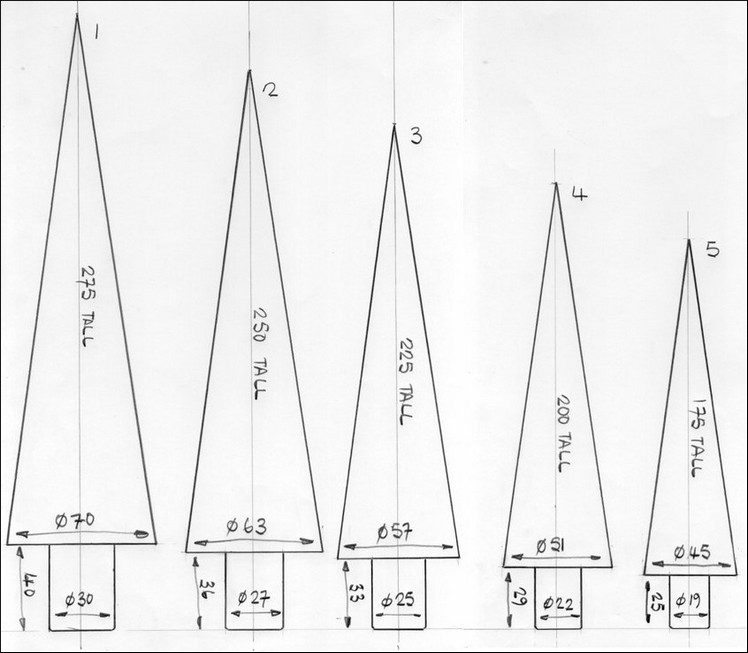
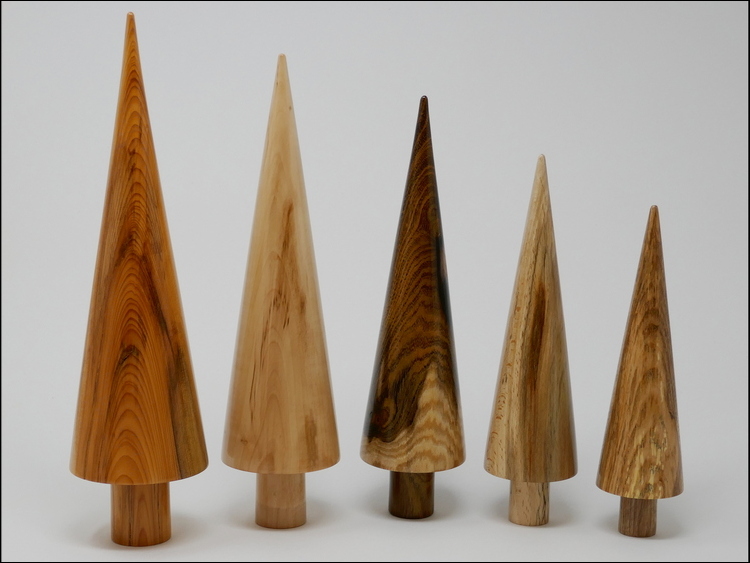
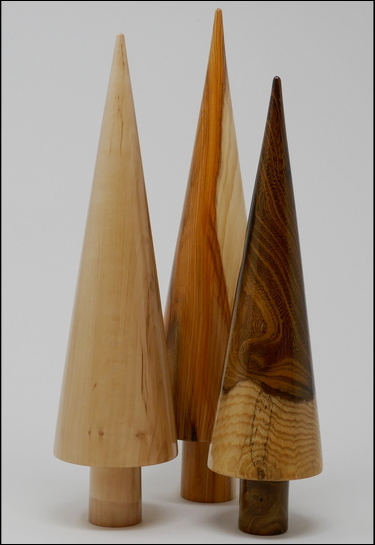
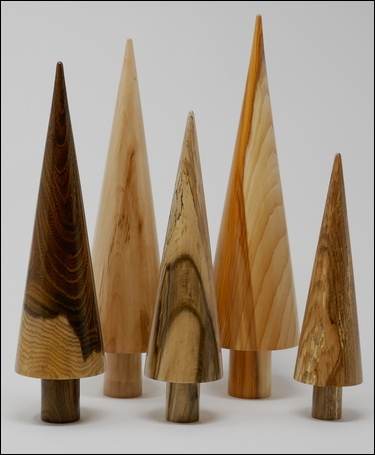
I made a series of simple cone shapes (a bit like very plain
Christmas trees) - having made the first one, and measured all of
its dimensions - I then made four more - each one being one-inch (25
mm) shorter than the one before it. Thus, No.1 was 275 mm tall, No.2
was 250 mm tall, No.3 was 225 mm tall and so on. The 'other'
dimensions for each piece were calculated proportionally.
For example: 275 mm tall (first one) with a largest diameter of 70
mm diameter - then, for a chosen height of 250 mm (second one) the
largest diameter will be 63.6 mm. For interest, the calculation is
expressed as: A : B = C : D (therefore, 275 : 70 = 250 : 63.6364).
In height order - the timbers used were: yew, apple, laburnum,
spalted beech and olive ash.
All items were finished with cellulose sanding sealer, buffed and
then a coat of microcrystalline wax was applied."
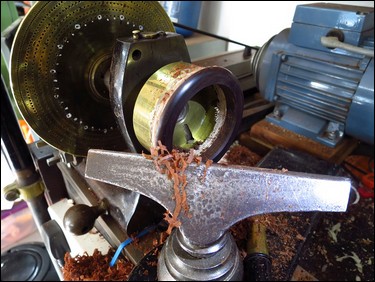
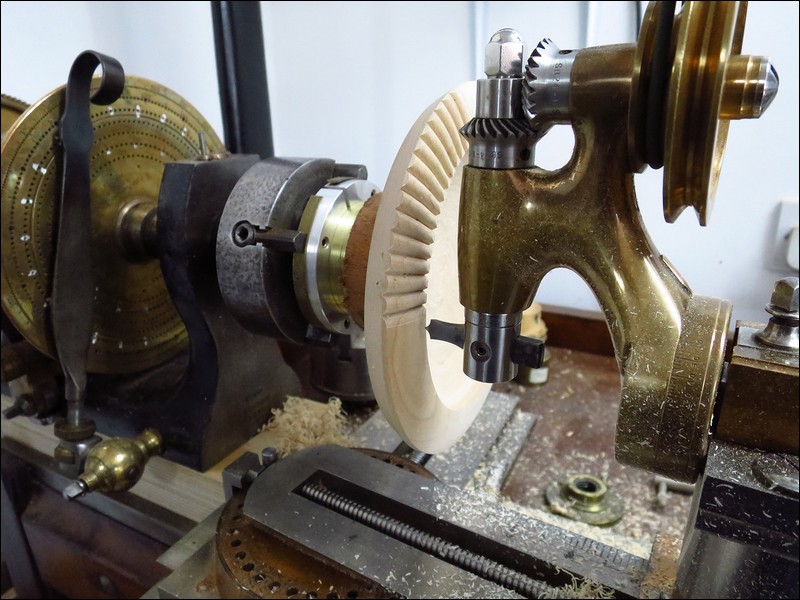
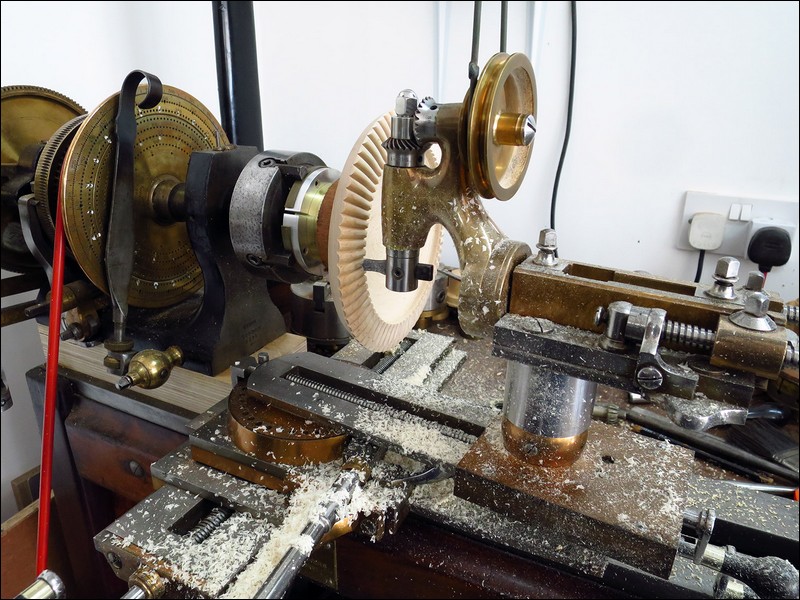
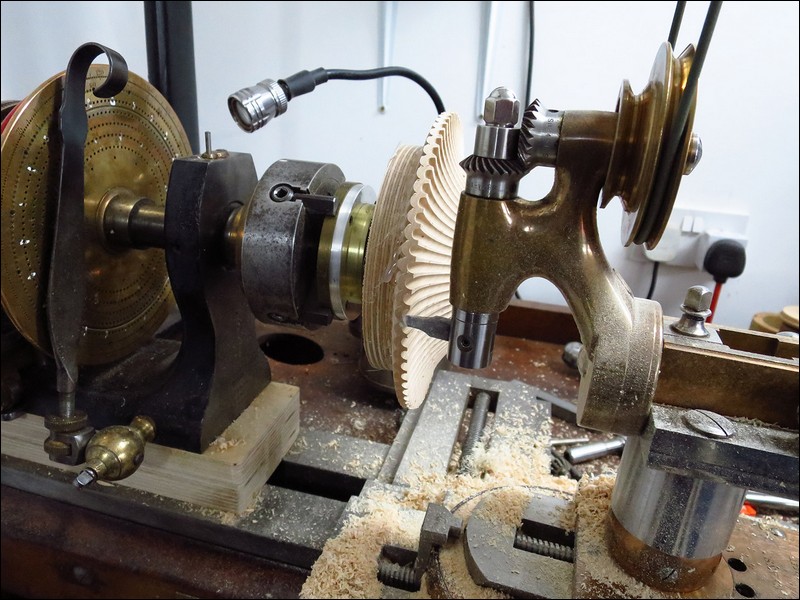
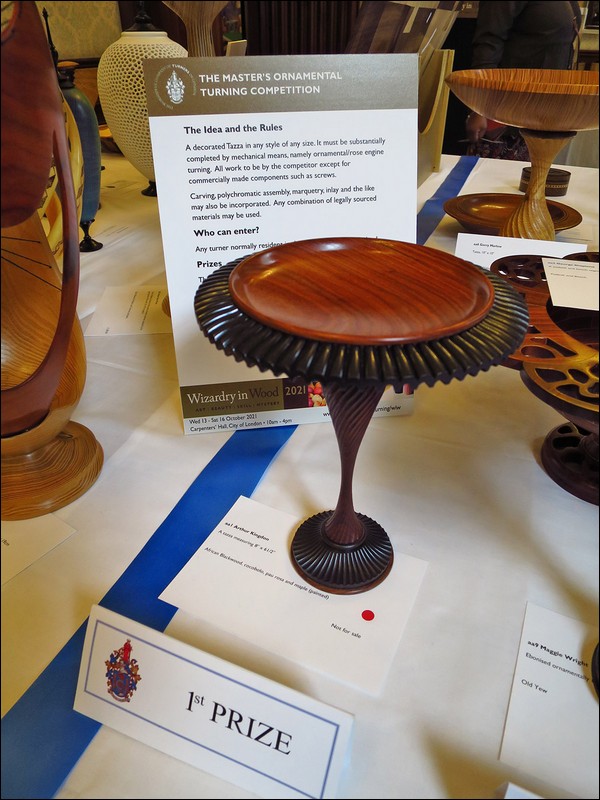
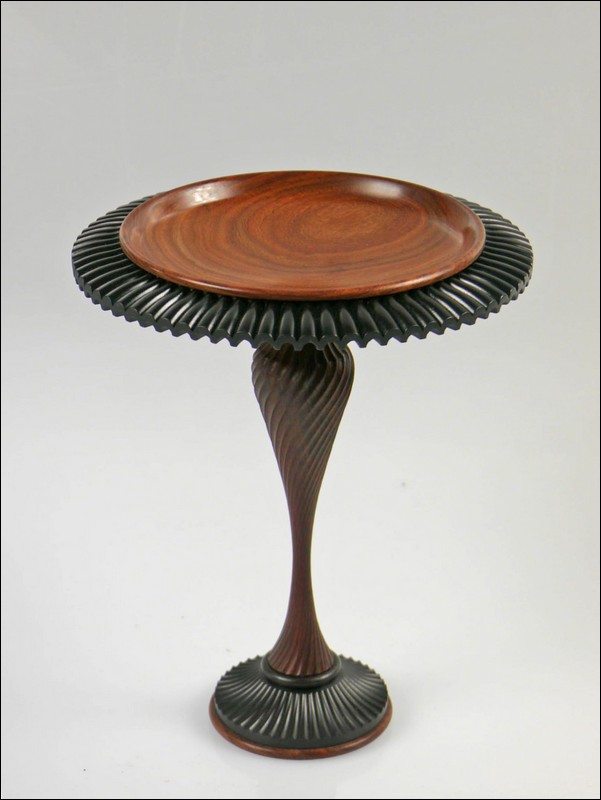
Arthur Kingdon writes - "Wizardry in Wood is a
biennial exhibition presented by the Worshipful Company of Turners.
It features displays, demonstrations, competitions and much more.
One of the regular competition categories is the Master's Ornamental
Turning Competition, which is for a set piece and this year it was
for 'A decorated Tazza in any style and of any size'.
I was keen to enter so I started sketching some designs and
searching through my wood store for suitable timber.
For the top, I found an attractive piece of tropical hardwood,
possibly mopane, but it was rather too small and too thin for the
design I had envisaged. However, having been inspired by the
work of Rob Stuart, I decided I could still use it if I surrounded
it by a larger piece of wood, which could be painted a suitable
colour. I settled on a piece of maple which proved
sufficiently hard and close grained to take the decorative cuts that
were planned. So, it was then a case of turning two bowls, one
to fit inside the other, all done by plain turning. The outer
edges of the maple were then turned to a curve using a spherical
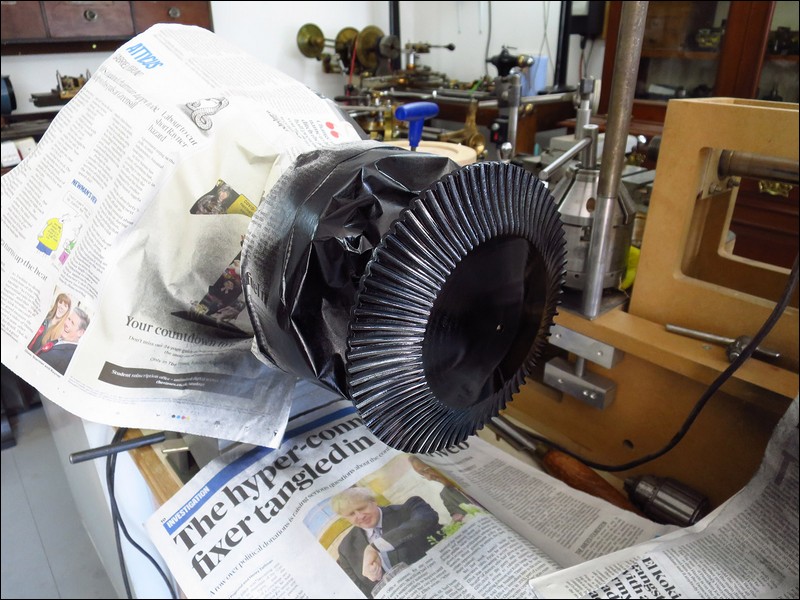
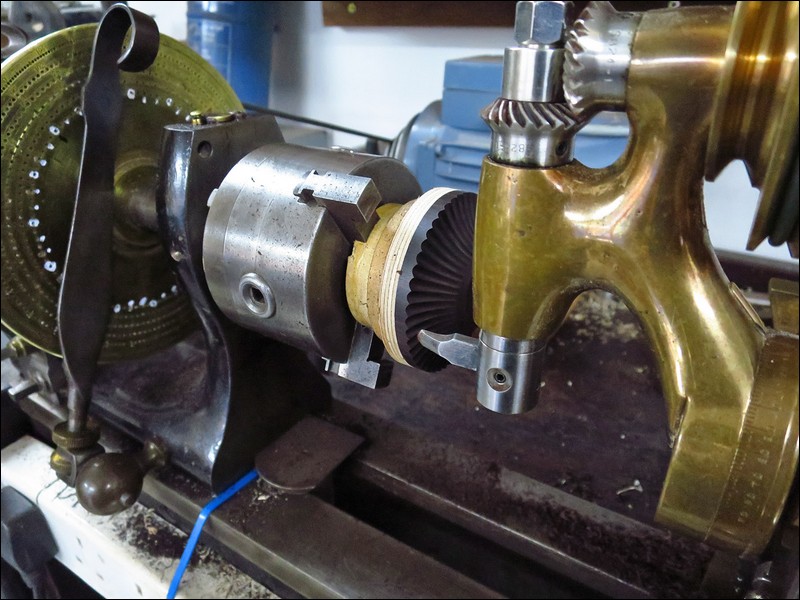
slide-rest on an Evans ornamental turning lathe dating from 1880.
The curved surfaces were then ornamented with fly cutters, indexed
72 times. It was then sprayed matt black.
NOTE:
All of the images in this section have an enlarged photo attached -
you will see the 'hand' icon/ cursor appear as you move over each
photo and a message to 'Click to display an enlarged image' appears
- then do so to show the enlarged picture.
Use your browser 'back' button to return to this page.
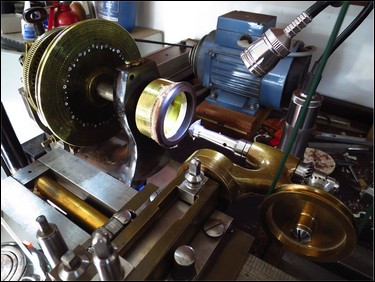
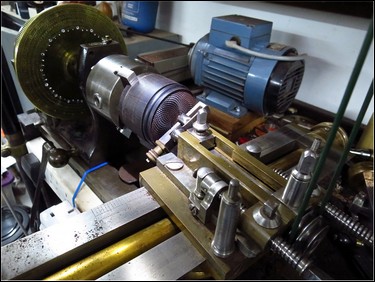
The stem was created from a piece of cocobolo. After rough turning
on my Nova lathe, it was machined to shape using a self-made tool
incorporating a 6 mm aluminium cutting tip. This was guided along a
steel template using a self-made follower with a 6 mm bearing, to
achieve an accurate shape and then - that shape was given sixteen
spiral flutes, using a cutting frame with a 6 mm half-round HSS
cutter. Having the cutters and the follower of the same size helps
with the accuracy of the shape.
The base was made from African blackwood, plus the remainder of the
wood used for the top bowl. Fluting was done on a Holtzapffel lathe
dating from 1811. It was then just a case of making a couple of
blackwood collars to blend the stem into the top and the base. A
simple wax polish was applied prior to gluing up. It measures 6.5
inches diameter by 10 inches tall.

The tazza was sent off for judging and was awarded first place. The
winning item is kept by the Worshipful Company for their collection
but I received a generous cheque in compensation."
Technical Definition: A tazza (Italian: "cup",
plural - tazze), is a wide but shallow saucer-like dish either
mounted on a stem and foot, or on a foot alone. The word has been
generally adopted by archaeologists and connoisseurs for this type
of vessel, used either for drinking, serving small items of food, or
just for display.
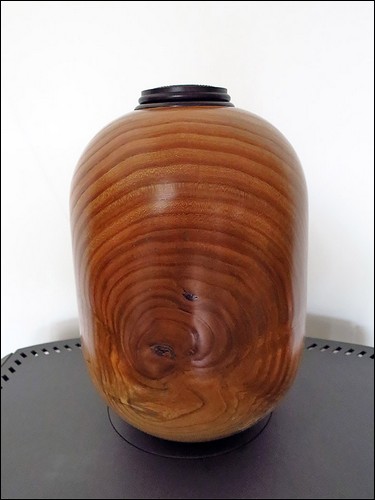
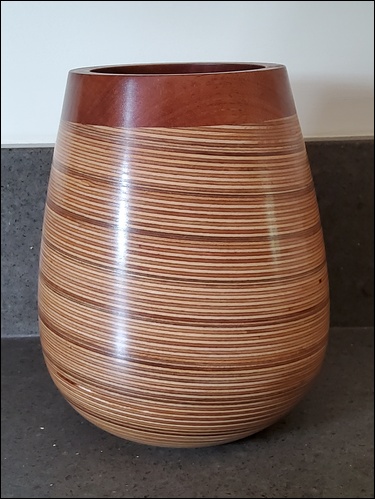
Steve Body Funerary Urn
The family of our recently deceased member Steve Body (RIP) asked if
any members of NWWA could make an urn for Steve's ashes.
This became
a joint project between Bob Sawyer and Arthur Kingdon.
Bob got his chainsaw out and cut up a large piece of wych elm which
he then hollowed using some pretty substantial hollowing tools. He
measured the capacity by putting a polythene bag inside and filling
that with water. This one holds 3.9 ltrs which is enough for the
ashes of a large adult. He sanded the surface and put to one side,
still on the chuck.
This was passed to Arthur who applied sanding
sealer and carried out final sanding. It was removed from the chuck,
reversed and then hot melt glued onto a jam chuck to enable the base
to be finished. It was then buffed and finished using carnuba wax. The finish size was approx. 290 mm (11.5 inches) tall by 170 mm
(6.75 inches) diameter.
The lid and collar are made from African blackwood. The collar was
hand turned to fit the urn and an internal 16 tpi thread was cut
using a lathe dating from 1811. A lid was turned with a matching
thread and then ornamented using an eccentric cutting frame.
Steve's family were very happy with the result.