
Club Night Report
Wednesday 14th September 2016
Club Night Report for 14th September 2016 - observations by Vernon Hughes
 |
 |
 |
 |
 |
 |
 |
 |
 |
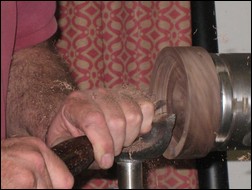 |
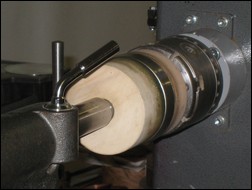
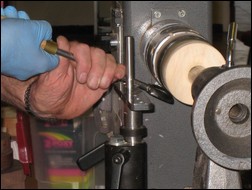
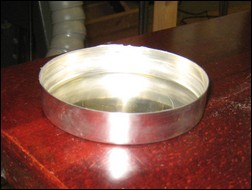
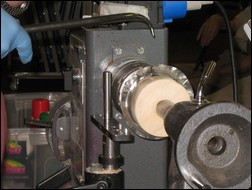
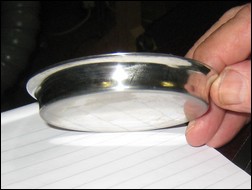
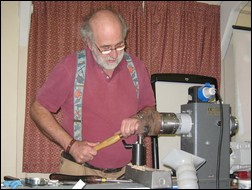
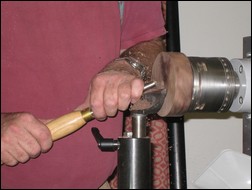
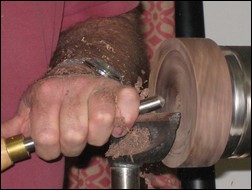
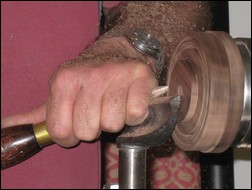
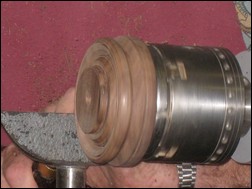
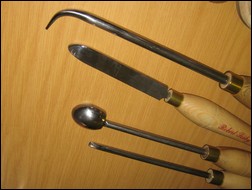
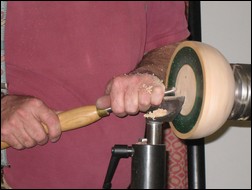
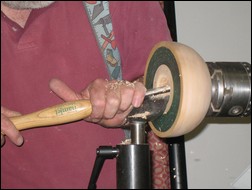
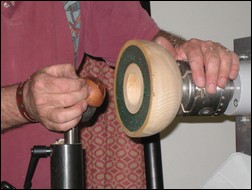
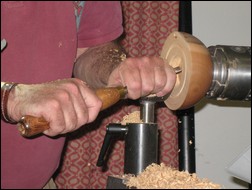
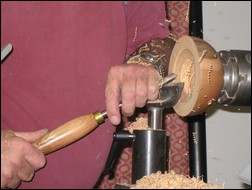
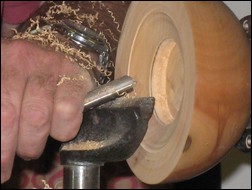
Steve explained that pewter, copper and brass could all be cut with woodturning tools but added that annealing would be necessary whilst working copper and brass. Application of a lubricant is essential with metal shaping, and as a former plumber he found it natural to use tallow (flux) for the purpose. He started with a thin 5" diameter disc of pewter to make an insert for a wooden wine coaster and explained the set-up of componentry on the lathe. This comprised a specifically shaped former at the headstock end with a 2" spigot for chuck mounting and a matching wooden pre-shaped tailstock support 'follower'. A disc of pewter was centred accurately between these supports, the tailstock being wound up hard to jam the disc securely. Steve emphasised that there is no mystery; the metal will repeat exactly the shape of the former over which it is worked. Lathe speed would be between 400 and 700 rpm. Shaping has a habit of going wrong at any higher speed! On tooling - Steve explained that special tools are needed and that he had obtained the last set made by Robert Sorby. He put them on display during the tea break. It is now necessary for us to make our own. He also displayed a range of formers he has made in a variety of shapes and sizes. He described as crucial the importance of a self-made wooden billet needed to support the metal during shaping. With the L-shaped pulling tool fixed under the right arm he used it to draw the exposed section of the disc firmly over the former with the billet supporting the metal in the bending process. As he proceeded Steve observed that if copper was being worked it would be necessary to anneal it before completion of shaping. The pewter responded very readily to his touch and it was soon time to neatly trim the rim using a skew. The swarf should be retrieved for melting down later. Steve explained that he tended to work below centre height but with the toolrest set high. With the tailstock released the parallel-sided, flat-bottomed dish was pulled off the former 'just like that' to use Steve's (and Tommy Cooper's) words. He had not applied metal polish in this instance but Brasso would be fine and 'T-cut' even better. He went on to talk about sourcing metal, the cost of purchasing ready-made discs, the difficulty of cutting circular metal blanks and the value of scrap hot water cylinders as a source of copper. These could be obtained for about £50 if sourced direct from tradesmen whereas it would be necessary to shell out £80-£100 for them at a scrapyard. Lagging is stuck on very securely indeed and there is the added challenge of lime scale removal. The trick to removing the latter is to heat the metal over a barbecue or fire. The scale will just pop off!
 |
 |
 |
 |
 |
 |
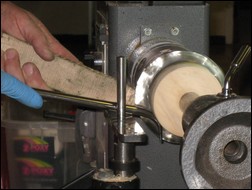
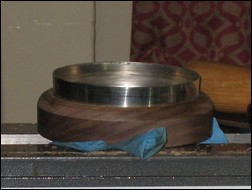
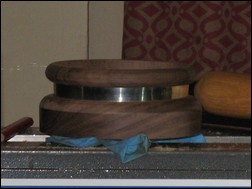
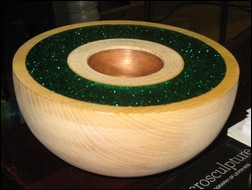
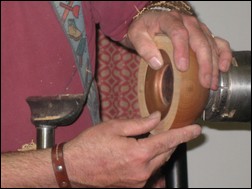
The first pewter item made was to be used to make a wine bottle coaster and would be mounted in an American Black Walnut (ABW) base, a blank of which was mounted in the chuck using a pre-cut 2" spigot. A recess was marked out and cut with precision using a small bowl gouge and finished/ refined with a small spindle gouge and a ?" parting tool (a long bevel bowl gouge would have been used but was not to hand). Upon offering up the pewter insert it was found that the recess was a little too deep, and there was a knot near the top of the rim. These details were adjusted by judicious use of the bowl gouge, and shaping of the outside of the base was then completed by rounding over in a pleasing curve. A second blank of ABW was then mounted to make a top ring for the coaster. This attractive feature would cover the sharp edge of the pewter. A groove was cut in the bottom of the ring to accommodate that edge. The three components were loosely assembled on the night to show the effect but would be 'finished' later, epoxy resin being used to secure the pewter into the base and the ring onto the top edge of the pewter to complete a single piece, a coaster of highly original design. (Note: Steve advised me after the meeting that an alternative design should be possible but would require practice. This would do away with the top ring and the pewter edge would be rolled over instead - to achieve a safe finish).
 |
 |
 |
 |
 |
 |
 |
 |
 |
 |
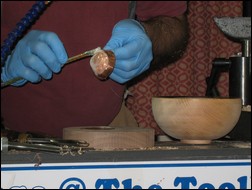
To round off the evening a 5½" Cherry blank was mounted, the outside shaping having already been completed. The wavy face of the blank was faced off with the bowl gouge. This piece was also to have a shaped copper dish (a large candle cup) at its centre. Again the process of hollowing out an appropriate recess was carried out step-by-step with great skill and certainty of touch. In fact the fit proved to be so perfect that a trial offering of dish to recess resulted in the former being impossible to remove. That would have to be a workshop job back at base in Newbury.
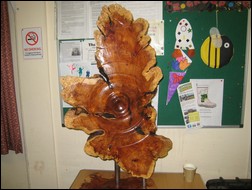
During the evening Steve called attention to his monumental and magnificent display piece using a highly elaborate section of Yew trunkwood. I suspect we had been rather slow to enquire how such a chunk could possibly have been mounted on a lathe. Arthur K seemed to know. He added that it was turned at no more than 100 rpm and that the finish had been obtained with just Danish Oil.
What an entertaining evening we had enjoyed; and did you all tune in to the underlying humorous content (asides, carefully timed repartee, ripostes and a little subtle banter)? Thanks are due to Steve for a great evening!
References:
See the May 2014 Club Night write up for further information on metal spinning and materials suppliers.
Epoxy Resin suppliers - investigate: CFS Fibreglass Supplies - Cornwall (www. .cfsnet.co.uk) and Alec Tiranti Ltd. - Thatcham (www.tiranti.co.uk)
This month's Show and Tell theme was - A Box.
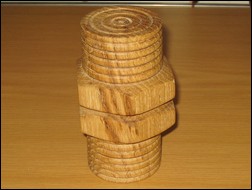
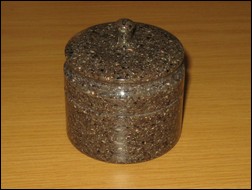
| Joint 3rd Show and Tell winners - on the left a 'nut' themed box in oak from Roger Blake and on the right a box in Corian from Richard Branscombe |
 |
 |
| Runner up this month was David Branscombe with an urn in burr oak | 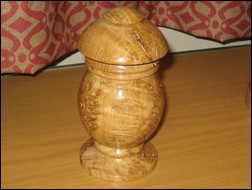 |
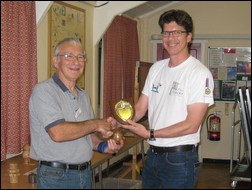
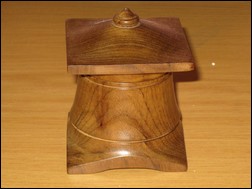
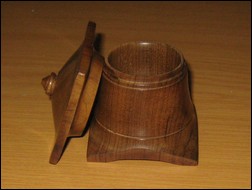
| This month's Show and Tell winner is Arthur Kingdon with a superb 'Pagoda Box' in American black walnut - trophy presented to him by David Branscombe |
 |
 |
 |