
Club Night Report
Wednesday 10th February 2016
Club Night Report for 10th February 2016 - observations by Vernon Hughes
 |
 |
 |
 |
 |
 |
 |
 |
 |
 |
 |
 |
 |
 |
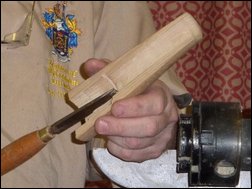
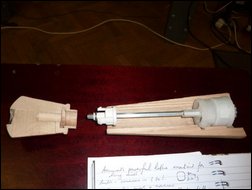
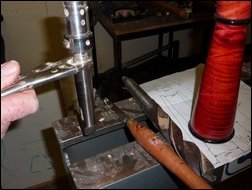
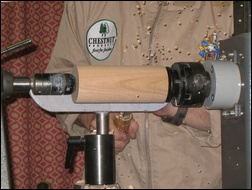
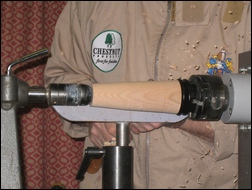
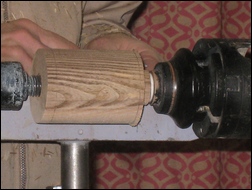
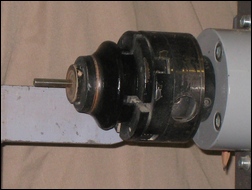
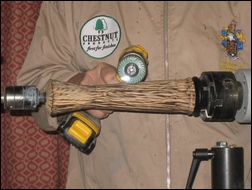
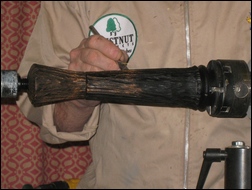
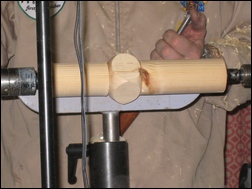
So how is mill-making done? The first point made was that an accurate powerful lathe is essential to purpose. Les added that his courses on the subject are arranged on a one-to-one basis to enable students to focus hard on the task in hand. The demonstration concentrated on external shaping and decoration but the internal work required was laid bare with a sample mill sawn in half along its length. One of his recommended (25 year guarantee) "CrushGrind" mechanisms obtainable from Axminster Tools (www.axminster.co.uk) was positioned to illustrate the fit and working arrangement of the internals. The possible methods of shaping these innards were discussed at some length. This consists of boring out accurately three chambers with differing diameters, large at the base, medium above it and then a long narrower one for the remaining length up through the separate top section. Les uses a long series twist drill for the small hole but has a purpose-designed mill drill tool for cutting the other two chambers. Note that the Morse taper shank of the mill drill can (sometimes) turn in the tailstock quill and may need a restricting bar; Les used some small Mole grips for this purpose. Note also the need for a narrow slot to be made at the top of the medium sized space to accept the fixing lugs/ clips on the mill mechanism body. An L-shaped undercut tool is needed for that detail. The Robert Sorby 'undercut tool' - often used in thread cutting is ideal for this. For those of us less efficiently equipped, we must remember to drill the holes in diminishing size order so that a 'centre' is always kept for the next (smaller) drill bit to locate into. (Note: there is a large supply of invaluable information about pepper mill making on the internet, including videos). Once the internal shaping has been completed the remainder of the turning is produced by locating on the 'holes' - this will ensure concentricity.
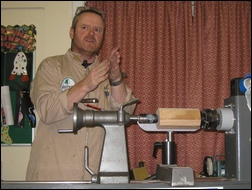
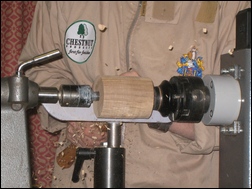
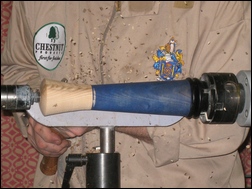
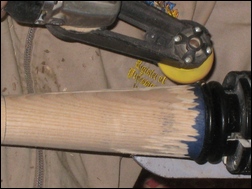
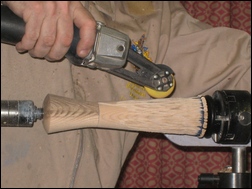
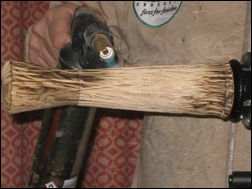
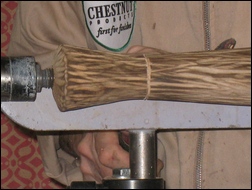
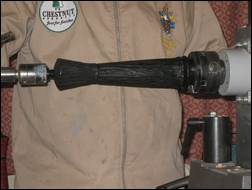
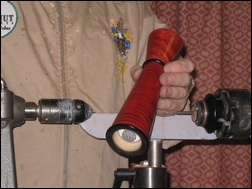
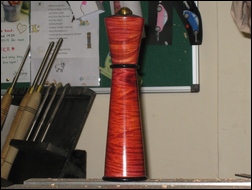
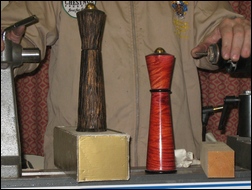
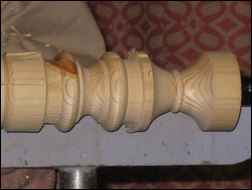
Les passed around an example of his design of an ornate mill, the shape of which would be repeated in his demonstration. He then produced a pre-prepared square section Ash blank, all four corners of which had been removed accurately on a bandsaw with the table tilted to 45°. It had also been sawn accurately into two sections. The corners had been removed to ease the roughing down process because he would be using a friction drive, but he recommended such preparation as general good practice anyway. In roughing down with his large gouge Les mentioned that he used only the centre of the tip for this work. The edges would be saved to achieve a fine sandable finish equivalent to say that obtainable using 180 grit abrasive. After roughing down to a cylinder, the base bead was formed and sprayed with black ebonising lacquer before the long tapered base shape was turned. Emphasis was given during this phase to the essentiality of creating a barrier between the bead and the rest of the base to prevent colour drift/ bleed and to the importance of a distinct v-cut between the bead and the main body above it. (Incidentally, lines burnt by pyrography make reliable barriers between colours). During tapering the toolrest was adjusted to an offset angle (parallel to the required taper) to facilitate tool movement and it was explained that when tapering, tool control is more comfortable cutting uphill rather than down because there is much less need for handle movement. Start at the small end of the taper and work 'back' to the larger end in steps of ever increasing lengths of cut. On completion, he would normally sand to 320 grit but did not do so at this stage. The base was then replaced on the lathe by the top section blank.
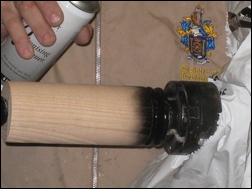
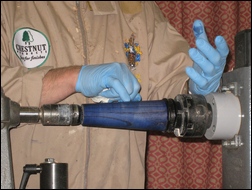
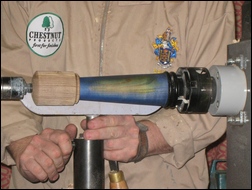
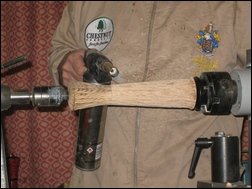
The first point made about the top was that there can be a problem of splitting when the capstan component is driven in, so bang it fully home before the blank strength is diminished by shaping. This was then mounted on a 5-sided (Les Thorne special!) drive spindle - that matched the CrushGrind mechanism spindle. The blank was roughed down (taking small cuts) to approx. 60 mm and marked out for shaping. There would again be a bead at the base, and the top would be shaped with a fine curve before spraying both extremities (although that was not done in this instance). The base was then remounted and sanded with 320 grit. Methylated Spirits (meths) was sprayed onto a section of the base to open up the grain (water is better for fluffing up but would take too long to dry). Coarse grit abrasive was then used to leave scratch marks on the top end of the base to give texturing features to be highlighted shortly. Wearing gloves Les applied blue stain by brush over the whole base removing excess pigment with a cloth. There were darker areas due to variation in penetration where the meths had been applied, and the scratch marks showed up (blue is best for these).
 |
 |
 |
 |
 |
 |
 |
 |
 |
 |
 |
 |
Les rounded off with a summary of marketing tips, including his observations that customers are influenced by the weight of a product, that boxes are available for about £1.50 (just make the mill length to fit the box) and men like boxes because they can then manage the wrapping! A card detailing the provenance of the timber/ source and maintenance of the item is always a good selling point. He added the advice that mills for salt should not be packed full because it swells up when exposed to humid conditions.
Les' presentation was crammed with useful tips, general information and snippets of advice throughout. Some points not included in this narrative so far were: the nature of some timber (especially rippled Sycamore and Maple) can give its own marvellous effect when colour is applied; end grain stains darker than side grain; despite the convention that lathe speed should be slowed for sanding work it can in fact be carried out at whatever speed suits the individual turner and the timber in use (wood is an inconsistent material); card making, artists and stencilling sites provide a wealth of information about the effects achievable with paint; abrasives can be classified into three groups - shaping (up to 120 grit), smoothing (240 to 600 grit) and the rest of little practical use for most people; always go through the grits in order without any omissions; texturing can be achieved with 'whatever you like'; wire wool soaked in vinegar produces a distinctive colouring effect and ammonia applied to holly turns it green; waxes and oils are not suitable for finishing items that are handled frequently - lacquer is the only finish that will last!, light pulls being a good example. Brass can be machined on a woodturning lathe (with care) - turn it the same as you would acrylics - use burnishing cream as a lubricant.
 |
 |
Les rounded off the evening with a final 25 minutes demonstrating tools in use (particularly the skew chisel), accompanied by non-stop and detailed commentary (and there seemed to be a steady trickle of demand for his tools). There is never a second's let-up when he is on the podium and we were exhausted after three hours; he was completely unfazed. Thankfully we managed to find the strength to deliver a more than well-earned round of hearty applause. Thanks Les!
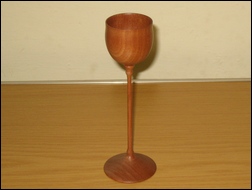
This month's Show and Tell theme was - A Goblet. This was not particularly well supported, but what was presented on the table was well made!
 |
 |
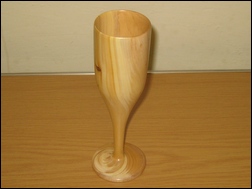 |
| This months Show and Tell winner is David Branscombe with a goblet made in three pieces - using Yew for the bowl and foot and Kingwood for the stem. | 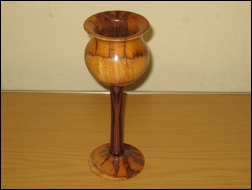 |
 |