Brian Oram
Welcome to Brian Oram's gallery. Here you will see quality craftmanship coupled with originality and inventiveness. Prepare to be amazed. In addition to the photographs, Brian has provided some excellent details of how the items were made and the techniques used:
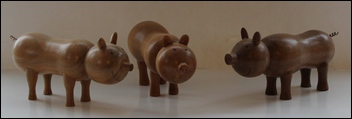
The three 'adult' pigs are 7" long and stand 3" high. The body, head and snout are turned in one piece - after the leg holes have been drilled first - using a pillar drill. This is important as it ensures that the legs are square to the body and evenly spaced. There are five 'hard' jobs in making a pig:
1. The ear 'holes' have to be cored out of the turned ear shapes
2. The eye holes drilled and filled
3. The mouth marked and curved
4. Legs stuck into pre-drilled holes
5. Legs sanded to ensure the pig stands up straight and does not
'rock'
Two pages of plans and instructions are available from Brian for £4.50 incl.
|
 |
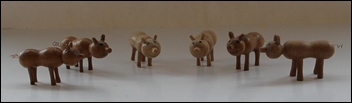 |
This is a large group (it may even be a litter) of 'piglets' - approximately one-third the size of an adult pig. Their construction is the same as for the larger versions.
|
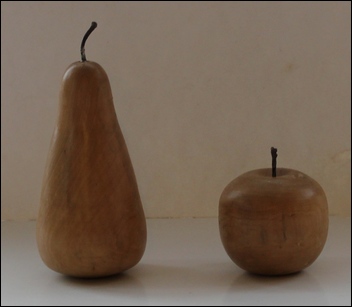
An apple and a pear - these are life size replicas of the real things.
The stalks are 'natural' and were taken off the fruit prior to consumption! They were then, glued in place after the turning was completed. The finish is aqua varnish.
|
 |
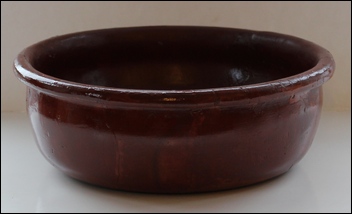 |
This is a large fruit bowl made for my grandson. It is 12 1/2" outside diameter, 11" inside diameter and 4" high. It was made from a large piece of London Plane. This had two severe shakes present - during turning it twice broke into two pieces! When completed, the repairs were very obvious - so the bowl was painted with a deep brown dye and then given several coats of aqua varnish.
|
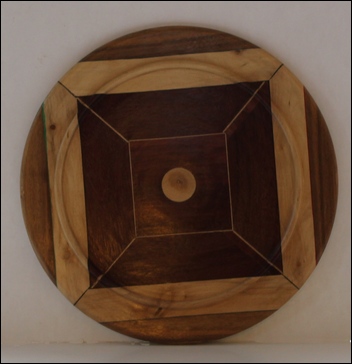
The finished size of this segmented platter is 11 5/8" diameter. I had acquired a square off-cut of Purple Heart which I was able to cut up to form the central square. In order to assist assembly and disguise some necessary filled in bits - they were stuck together with a layer of white veneer in each joint. The next outer layer of 'whitewood' is Tulipwood. The final edge pieces are in Walnut. The outer edges are stuck together with different colour veneers of black, green and red to add a decorative effect.
To hold the wood in the lathe a 3" diameter piece of Lilac was turned to have a 1" diameter by 1" long spigot. The platter blank was cut to a circular shape and a 1" diameter hole drill in the centre of the Purple Heart - and the Lilac spigot glued into this to protrude on both sides.
This enables the platter blank to be held in a gripping chuck at the bottom side and into a central pin at the lathe end. The face of the platter was turned with a 1/4" half round bead just spanning the Purple Heart square and the bottom was turned down as far as the Lilac holding spigot. After finish sanding the Lilac spigot was cut off on the lathe side - and then sanded. A food-safe oil was applied as a finish.
|
 |
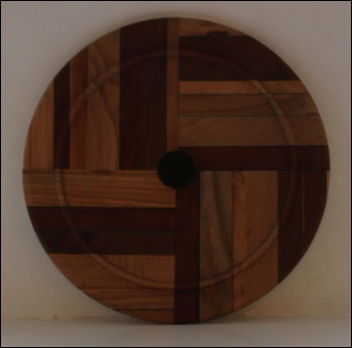 |
This platter was made from off-cuts - it has an Ebony centre piece, Purple Heart, Beech, Walnut, Lacewood, Mahogany and coloured veneers. I cut up all of the odds and ends of the various timbers to the platter blank thickness. Then, depending on their lengths - assembled the four quadrants - glued up each segment separately with the coloured veneers between the woods. Once the glued pieces were hard set - the four 90 degree joints were accurately machined - and then stuck together to form the platter blank.
The centre of this blank was then drilled - and the Ebony turned to fit the hole - and glued in position. The other end of the Ebony centre was turned to fit the lathe drive chuck.
The platter was turned to 10" diameter - with an inner 1/4" bead positioned at 1" from the outer edge. The platter was finish sanded and given several coats of food-safe oil as a finish.
|
These were my final platters in my 'platter sequence'. Having made two with straight line geometric patterns (see above) - I wanted to try a circular type of design. I decided on a double spiral in two different timbers. As is my usual practice - I drew a full size pattern of what I wanted to achieve. I have no doubt that there are mathematical formulae for spirals - but, I didn't know one! So, I worked from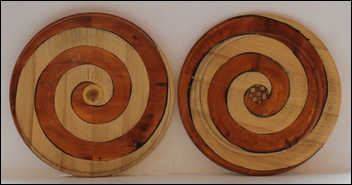 first principles. first principles.
A full circle 11" in diameter was drawn - I then drew five diametrical lines, crossing through the centre at 36 degrees to the next (5 times 36 = 180 degrees). Considering that each of the separate spirals was to be 1 3/16" (30 mm) in width - this meant that the spiral line had to move out approx. 1/4" (6 mm) segment by segment. This was drawn on to the pattern - working from segment to segment - adding the 1/4" each time until it 'disappeared' off the edge of the circle after 23 segment 'moves'. That produces one spiral. Then, starting from the outermost point where the first spiral exits the circle - measure in 30 mm (the thickness of the pattern) from the junctions at each diagonal line to form the new inner spiral.
Having prepared the plan - the next job was to make up two 12" square by 1" thick planks of different coloured woods. I used Tulipwood and mahogany. The two square blanks were taped together with masking tape, the centre marked and a 1/4" diameter hole drilled through on the pillar drill - to ensure an accurate square hole. A 1/4" by 2" long pin was turned. In order that the blanks would not stick together too solidly - the inner centres were covered in masking tape prior to drilling. With the two blanks held together with masking tape - the 1/4" diameter pin was glued into the centre hole. When the glue had set - the two squares were held firmly together.
Using a sheet of carbon paper under the pattern - this was attached to the top plank with its centre on the pin - the double spiral was transferred to the wood by applying firm pressure on the pencil line with a pencil. A narrow 2 mm blade was set up in the bandsaw and pulled up to full tension. Taking great care the two spiral lines were then cut from the outside edge to the centre - ensuring that they joined up together at the centre. Whilst the cutting is not too difficult - extracting the saw blade once the centre is reached is not so easy!
Having completed the cutting - the four spirals need separating - easier said than done! An initial dry fitting of the two different colour spirals proved even more difficult than taking them apart - as cross-grain cutting of the wood sparked new tensions and movement in the wood. At this stage it was necessary to ease the spiral slopes with a half-round rasp where they were too tight to fit together. This was not a measured job - but just done bit by bit until I could press them together.
I had thought that when planning the platters that the width of the saw cut might be filled with a strip of black veneer - but this wouldn't work! I resolved, instead, to stick them together using a black filler glue. I made this up by mixing PolyFiller, black poster paint powder, a good dollop of PVA glue - and enough water, added drop by drop, to produce a black paste glue. Before using this I applied PVA glue to the joining faces of the spiral and then a layer of the glue filler - then the two spiral were squashed into place. It is useful to wear surgical gloves - which can be purchased from dispensing chemists - when doing all of this because inevitably, your hands get very mucky!
The centres of the blanks were drilled to take a lathe mounting bar and once turned - which took around 8-hours - were cut off the mounting bar. The centres were then drilled out again and the finished centres inserted. In one platter a small Acacia branch was turned to 1" diameter - glued and then finished. In the other - I stuck together 25 1/4" squares by 1" long pieces - which were cut from Tulipwood and Mahogany. These were assembled into a grid pattern - and then turned/ glued to fit the centre hole. An oil finish was used to complete the project.
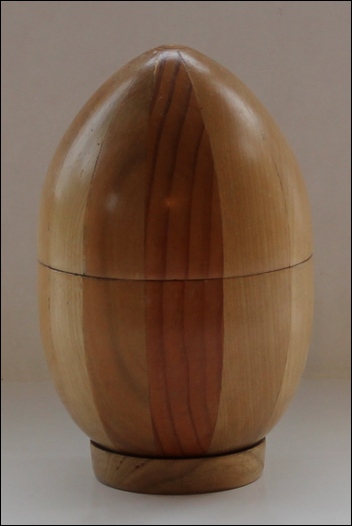
The Easter Egg Box has a finished size of 4 7/8" diameter at the centre and is 7 1/2" high. It is constructed in twelve segments in three different woods. This required four lengths of each coloured wood to be 8" long by 1 1/2" thick by 3" wide. These sizes allow for the reductions in the turning process.
Each
length of wood has to be cut down to a triangular cross-section with a
top angle of 30 degrees for the inner joint. The bandsaw needs to be
set to cut an angle of 75 degrees. The two sides of each length of wood
are then cut - exercising great care with this difficult operation.
Once cut to the angle - all lengths need to be cut to 8" pieces - and
sorted out into the pattern of the three wood colours. It is my usual
practice to coat both faces of the wood to be stuck together - this
ensures a good glue penetration to each face glued.
Once the twelve segments have been brought together - they need to be tensioned to hold them together. For this, I used three rope tourniquets. Once the glue had set, I gave attention to the centre joins at top and bottom. Inevitably, these were a mess! 5/8" diameter by 1" deep holes were drilled at each end and suitable bungs made of Acacia were glued in position to 'ease' the misfits.
The segmented block was then turned to a cylinder, halved and hollowed as a standard box. The stepped joint at the centre reduced the height to the designed 7 1/2". It was finished all over with a lacquer varnish and wax.
The base for the egg is 3 1/2" diameter by 1/2" thick - the upper side being shaped with a 1/4" deep recess. A cardboard template was made from the finished egg base - so that a close fit in the base could be achieved. The base was finished with lacquer and wax.
|
|
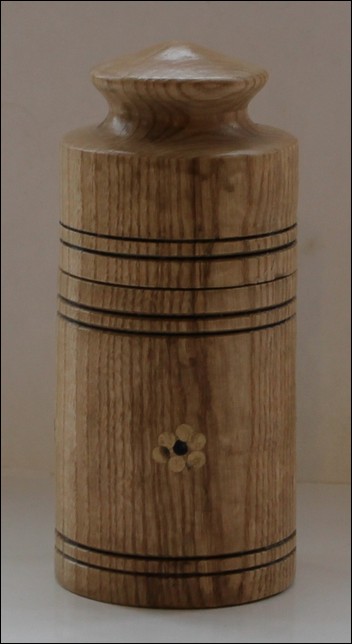 |
The box is finished to 3 3/4" diameter by 9" high - with a 7/16" stepped recess joint 5" up from the bottom. The top 'finial' is 2 3/4" diameter and stands 1 1/4" high. The holding finger recess is 2" diameter.
The box was made from a 4" square by 10" long piece of Ash. The 'flower' decoration is made up of a centre plug of Ebony (1/4" diameter) and five 'petals' - all 1/4" diameter made of Acacia, equally spaced around it. The decoration was created prior to the turning. Each side of the 4" block was marked out with all six parts of the 'flower'. The drilling of the holes for each part was carried out whilst the block was still in its original square form. Owing to the closeness of the holes for each flower part - the drilling has to be carried out in three separate operations - otherwise the holes will 'join together' and spoil the desired effect.
First, the Ebony centre holes were drilled 1/4" diameter by 3/4" deep - and the Ebony glued in position. 24-hours was allowed for the glue to dry - then, holes 1 and 4 (petals) were drilled and the Acacia plugs glued into position. After a further 24-hours - holes 2 and 5 were 'drilled and filled'. Finally, after another day for the glue to set - hole number 3 was drilled and filled. This is a tedious business - but, necessary in order to produce a clean cut result.
Apart from the 'flower' decoration - the box followed standard turned box making techniques. The black decorative lines were burned with a thin steel wire. The applied finish inside and out was three coats of aqua varnish and wax.
|
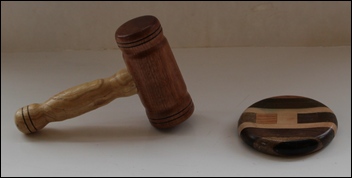
The gavel and pad were made out of off-cut/ 'rubbish' bits of timber. The head of the gavel is 4" long by 1 1/4" diameter - made from an off-cut bought from Yandles 'rubbish' box. It is a simple cylinder with gentle indentations 3/4" from each end. The ends are decorated with burnt black lines similar to the turned box (above). The handle is made in Sycamore - 1" diameter by 5" long - 'hand' shaped with recesses top and bottom to fit into ones hand and two burned lines on the bottom knob. It was let into the head with a 1" long by 1/2" diameter peg - which was made separately so that the top joint of the handle could be shaped to fit snuggly in the head.
The pad is also made of 'rubbish' timber. I won five 5/8" square by 4" long, unidentified, different colour pieces of wood in the Club Raffle! Their only identifying mark was that they came from China!
Equal sized squares were cut off the ends of each piece - and glued together to make up the centre section. The 'white' piece of wood was cut in half lengthways and glued onto each side of the centre section. Two more strips were added and finally two more to create the basic circular blank. In gluing it together I ensured that one face was absolutely flat - then one of my 'platter' turning bars was stuck to the centre of this face. The finish was lacquer and wax.
|
 |
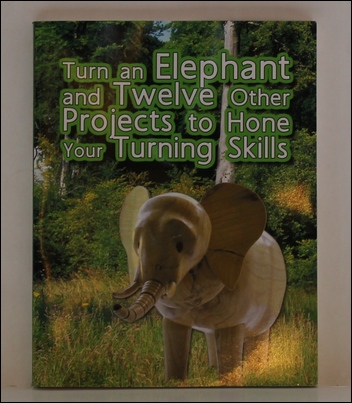 |
Making an elephant takes over 40 pages of instructions along with numerous diagrams and photographs in my published book "Turn an Elephant and Twelve Other Projects to Hone your Turning Skills"
This is published by AuthorHouse Publishing, 1663 Liberty Drive, Bloomington, IN. 47403, USA
It is also available from Amazon UK - ISBN: 1456796275.
|
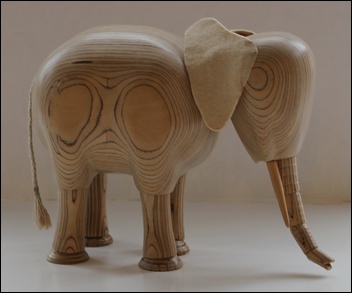
Prior to the formation of the NWWA - I was a regular attendee of the Avon and Bristol Woodturners Club - and attended both Clubs for a number of years. Their monthly project was a competition judged by the guest demonstrator or a Member of the Club. At one of the last meetings I attended in 2011 the competition subject was: "Animal, Vegetable or Mineral" - and my entry was an Elephant. It won me the first prize and a bottle of wine!
The elephant is made from 15 mm - 11 ply, plywood. Ten pieces of 170 mm square were stuck together to form the body. Chuck mounting blocks were stuck on each end and three turning centres were used. The two outer centres turned the top and bottom shapes of the body, whilst the true centre was used to round off the backside and shoulders.
The leg sockets in the bottom were manually shaped using rasps. The loins were also shaped in this process. The elephant is fully articulated - so the head, legs and feet are jointed into the body with half-round joints pulled together with round elastic.
The head is triangular - 75 mm wide at the top down to 45 mm at the base and 100 mm long. The top section of the trunk is 25 mm in diameter and the bottom of the head was shaped with a round rasp to leave raised sections each side of the trunk hole to take the tusks. The tusks are 1/2" diameter tapering to 1/8" for 2 1/4" - they are 2 1/2" long and let into the head. The trunk protrudes for 100 mm and tapers from 25 mm down to 10 mm. It's made up of four sections - each with a half-round joint at the top and a half-round recess at its base - each being made to fit the diameter at the joining point.
The elephant's ears are made of two thicknesses of felt -stuck together and glued to the head. The 6" long tails is made from three pieces of string plaits down to the last inch - this is secured with glue.
A large hole was drilled up into the 'belly' of the elephant and the leg and head holes drilled through to accommodate the elastic which was threaded through to a screw-eye. Once every part was pulled into place - a plug was glued in to fill the belly hole - taking care to line up the plug.
|
 |
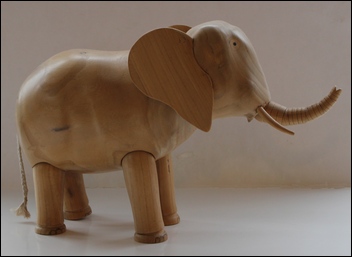 |
I wasn't satisfied with elephant no. 1 so set about making No. 2.
This one has a body made from two pieces of Elm. The inside was drilled out - as I had decided that the head had to move! The head was counter-balanced with a lead weight and the body/ head junction encased in a shoulder shield. The ears were made of wood by turning a 9 3/4" diameter platter with a saucer like depression in the centre with a thin raised rim. The ears were cut to shape from the inner rim - which was used to make a joint with the head which had a narrow trough carved to stick the ear rims into.
|
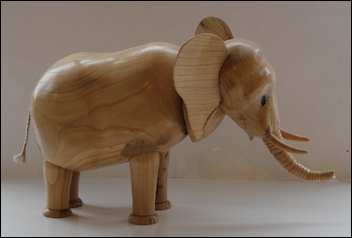
Elephant No. 3 was made in four sections of Elm. These had the centres cut out before gluing them together - in order to shape the inside hole. The head was balanced using a ball bearing on a metal axle - the lead counter-weight was fixed to a threaded bar and the balancing assembly was set up on a jig to get the balance precise. The assembled head 'nods' up to six times when pushed down. The whole project - to include the lead mould, lead melting, balancing jig, final adjustments - plus the turning and shaping! - took around 100 hours. Alas, I cannot put a price on him for sale!
|
 |
Brian clearly enjoys producing colour and interest through laminating contrasting coloured timbers together. Here are some examples of his earlier work:
|
|
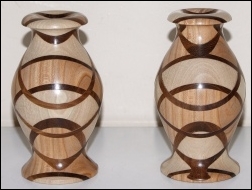 |
First up is a pair of laminated vases. This employs multi-generational lamination. This is just a high-falutin way of saying that pieces of wood are glued together (that's the 1st generation), then cut again in a different direction across the join line and glued back together with a contrasting-coloured piece of wood in between (that's the 2nd generation). As you can see, it gives rise to all sorts of interesting effects.
|
|
|
|
|
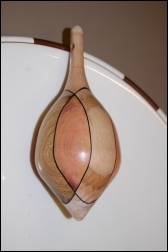
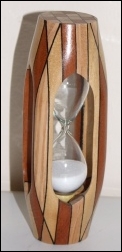
Now we have another couple of examples of the same technique. On the left we have an egg-timer (and I'm still wondering how he managed to get the glass in there without cracking it!).
On the right is a lidded box. Quite a good idea having those dark lines in the piece because it takes the eye away from the line where the lid joins the base.
|
|
|
|
|
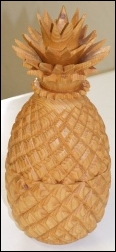
For the Show 'n' Tell spot at the June 2007 club meeting we asked members to turn some fruit (or vegetables!). We were expecting some apples, pears, maybe the odd banana even . . . and it would certainly have been an odd banana if it had been turned on a lathe. However, Brian rose to the occasion, thinking outside the box and produced - yes, a pineapple. He also had to think inside the box however, because, you've guessed it, it's a lidded box as well. A great "two for one" opportunity.
|
|
|
|
|
|
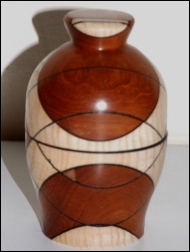
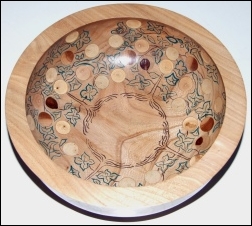
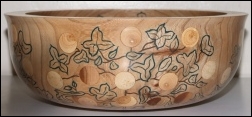
Now for something a little different. Yes, it's a bowl, but no ordinary bowl. It's another tribute to Brian's inventiveness. This one involved inlaying a number of different coloured plugs in the bowl as well as some deft work with some carving tools and coloured filler.
|
|
Aug 2007
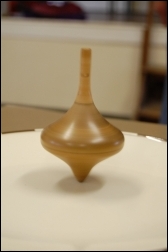
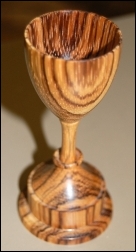
At July's meeting, Brian demonstrated how to make turned spinning tops. Here are a couple of examples of his work:
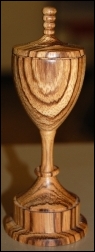
Now it seems that Brian is pretty good at this spinning top lark and, in recognition of this he won a competition at the Avon and Bristol Woodturners Club for the top pictured above (the one in the middle). The photo shows it spinning and, thanks to a quantity of lead encased in it, it actually spins for about four minutes! Consequently he won the fabulous little cup pictured below which was turned by fellow club member Julie Heryet.
|
|

I've taken three shots of this remarkable little trophy. You can see that the lid (above) is actually a tiny spinning top.
|
|
<Top of Page>
|
|
|
|