
Club Night Report
Wednesday 10th September 2014
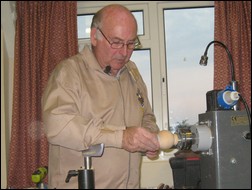
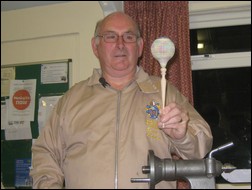
Club Night Report for 10th September 2014 - observations by Harry RockOur guest demonstrator for the evening was Gerry Marlow - a Yorkshireman who now resides in Derbyshire, was going to start his demonstration with an unseasonal 'Christmas Decoration'.
 |
 |
 |
 |
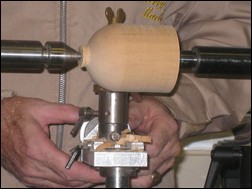
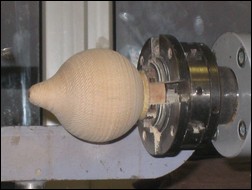
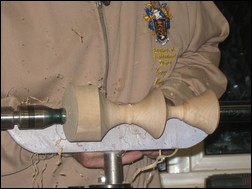
Gerry started with a 3" square by 4" long piece of lime (or you could use sycamore) - as it takes the colouring well, held between Steb centres and proceeded to turn the blank to a cylinder. He then set up his ball turning attachment (home-made/ designed) and shaped the tailstock side. Taking small cuts with a 'proper' spindle gouge, properly angled/ tilted in the jig - rather than the usual scraper that most other ball jigs seem to use. He repositioned his jig and completed the other side to produce a very smooth sphere that would require very little sanding. A spigot was left for the next operation. Holding on the spigot in a 4-jaw chuck, Gerry hollowed out the sphere, with an opening measured to match a 'battery driven, flashing light, colour changing insert'. He showed an interesting use of a small plastic tube to 'blow out' the chips from the hollow - so he could see what was happening. A small scraper with 'home-made' silver steel cutters (just a thin sharpened disk, with a hole, attached to a bar and handle) - was used to smooth the inside of the sphere.
 |
 |
 |
 |
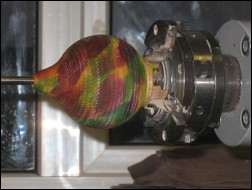
The textured part was then coloured with Chestnut Spirit Stains - randomly 'dabbed' on with paper towel - Gerry used purple, followed by blue and finally yellow - completed with a thickish coat of liming wax - to fill the spiral indentations. Surplus liming wax was removed with a paper towel - then finally, clear wax was used, under speed, to remove some of the liming wax to produce the desired effect.
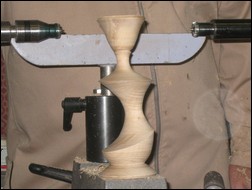
Next, a slot cutting jig (originally a Keith Rowley design) was mounted in the toolpost banjo and aligned over the top of the sphere. A plunge cut was then made through the wall of the sphere - index the part - plunge cut - index the part - plunge cut - and repeat until 24 slots had been cut around the sphere. The part was rotated by a small amount in the chuck and another 24 slots were cut - to give 48 in total. Gerry freely acknowledged that not many of the Membership would possess such slotting equipment, but suggested a couple of good alternatives. Rows of holes - in sequence of 3, 4, 5, 6, 5, 4 and 3 mm diameter could be drilled along the length of the sphere/ finial along with some indexing - to produce a suitable effect. Or, create a support platform and use a Dremel type machine (plus indexing) to produce a slotted effect. The Membership were then able to 'share the experience' as Gerry handed the slotted part to the audience for examination and for them to sand/ de-burr the slots whilst he got on with the next component.
 |
 |
 |
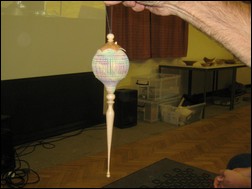 |
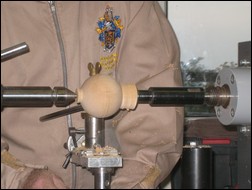
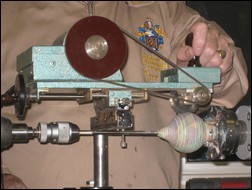
Out came the superglue to fix the 'flashing light' bit into the top of the sphere and the long finial into the bottom.
The top of the decoration was basically an umbrella shaped (with scallops) cap with a hole in the side to turn the light on/ off. The usual turning techniques were (rapidly) used to rough out the shape, add a spigot, hold in a 4-jaw chuck, drill part way with a 1 1/2" diameter custom shaped spade bit (it had 'shoulders' and a depth mark) - drill through with 8 mm diameter drill for the 'hanging' finial and finish off with a spindle gouge.
After the break - Gerry made the knob/ finial for the top of the decoration - drilled through and super glued a small hanging loop in the hole - and a small on/off button that fits into the cap.
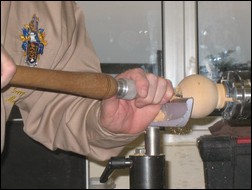
Before the final assembly Gerry used a small diameter sanding drum mounted between centres to carry out his 'ornamental turning' on the cap. He marked the positions out by 'eye' and then just sanded 6 scallops into the rim on the sanding drum. An interesting, original, easy and fast technique! The final alignment, fitting, assembly and super gluing were carried and the part was complete.
NOTE: Gerry has a favourite Children's charity that he usually donates his Christmas decorations to. However, he decided to give the item to the Club for auction. Arthur Kingdon conducted the auction and sold the decoration for £30. This was then given to Gerry for the children's charity.
 |
 |
 |
|
The rattle was buffed through the usual 3 stages - Tripoli, Diamond White and Carnauba Wax.
 |
 |
Conclusion: An excellent evening spent being entertained by a master of his craft. There was never a dull moment - Gerry worked and talked at full speed throughout the entire night. Lots of techniques, lots of tips and tricks, lots of humour, lots of savings flying - what's not to like? A good night!
<Top of Page>
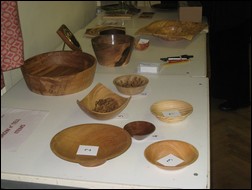
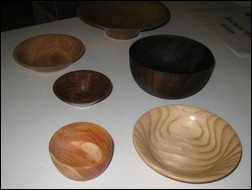
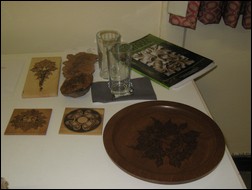
The Show and Tell - theme for the evening was: A Bowl - this was well supported and displayed some interesting pieces.
 |
 |
Mike Crawshaw announced the results in reverse order:
 |
 |
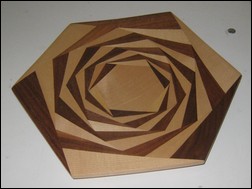
Joe Kerrawn with an octagonal segmented platter in Sycamore and American Black Walnut. See the Odds and Ends page (www.northwiltswoodturners.co.uk/OddsEnds#techniques) Spiral Platter Project for Joe's account of how the piece was made.
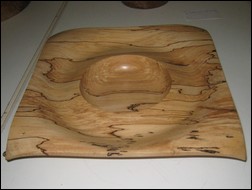
Bob Wells with a Spalted Beech square topped bowl - approx. 12" square
 |
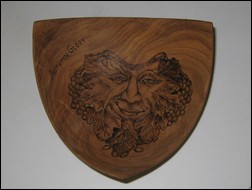 |
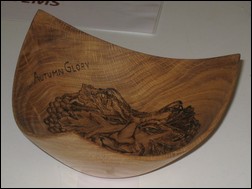
Dave Branscombe was this month's Show and Tell winner with a 3-lobed triangular bowl with a pyrographed 'Green Man' in the base. The piece was made from a 9" square section of Oak gatepost - wall thickness is 3 mm.
 |
 |
<Top of Page>