
Club Night Report
Wednesday 10th May 2017
Club Night Report for 10th May 2017 - observations by Vernon Hughes
 |
 |
 |
 |
 |
 |
 |
 |
 |
 |
 |
 |
 |
 |
 |
 |
 |
 |
 |
 |
 |
 |
 |
 |
 |
 |
 |
 |
 |
 |
 |
 |
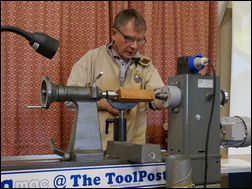
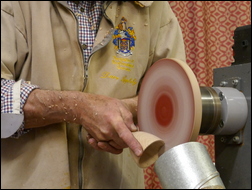
Before starting on the first item (the spoon) Dave admonished us about the condition of our toolrest and proceeded to clean it up quickly adding that frequent polishing really does help tool movement.
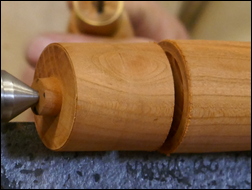
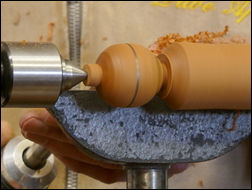
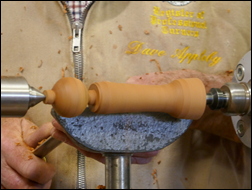
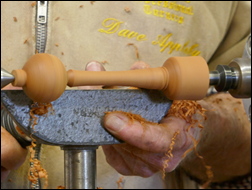
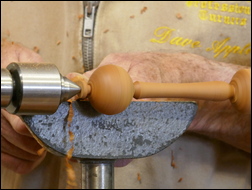
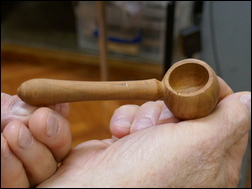
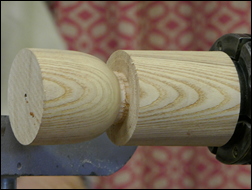
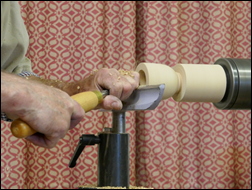
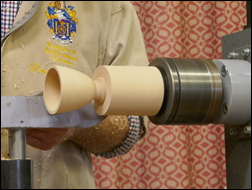
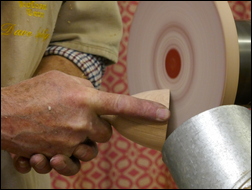
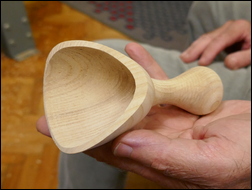
Looking at spoon and scoop design it will be seen that both require square section blanks of appropriate length to provide for a 'bowl' with a handle of design and proportions to suit the function and please the eye. For the salt spoon Dave mounted a 6" long by 1.5" square blank of Cherry Plum between centres (it had a pleasing colour). Roughing down was performed in a series of steps towards the tailstock end until almost complete, whereupon the direction of cut was reversed to finish off the cylinder. Once perfected the next step was to create a ball at the tailstock end for eventual hollowing to make the bowl of the spoon. The diameter of the cylinder was measured and that dimension was used to mark the blank working back from the tailstock end, but allowing for a short spigot to be left at the tailstock side of the ball. A halfway position was also marked as a sphere-shaping guide. A 1/8" parting tool (aka a dimensional tool said Dave) was used to make a cut at the pencil mark down to approx. handle diameter before shaping the ball (to the exact diameter essential to achieving a snug fit in a jam chuck soon to be brought into play). The handle was then shaped with pleasing lines and a neat feature was made at the neck intersection with the ball. The piece was then parted off at the tip of the handle and the short remaining spigot protruding from the ball was removed by saw. Two options were then considered for mounting the ball section of the piece in such a position that the handle would be at 90° to the line of the lathe bed to provide for hollowing out the ball. Dave offered a jam chuck and a wood jaw chuck as options (with instructions for making the latter) and started with a pre-prepared jam chuck mounted in a standard scroll chuck. In the process of hollowing with a spindle gouge the spoon ejected itself from the jam chuck three times in all but Dave advised with great equanimity that it is worth persevering when this happens because it is a practical and pleasing method of workholding. Accurate re-positioning was achieved with a mallet but after the third ejection Dave switched to the wooden chuck jaws to save time and soon completed the hollowing. He sanded the bowl and advised that sunflower oil from the kitchen gives an excellent and appropriate finish.
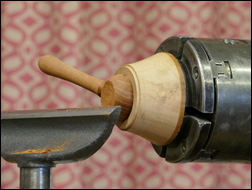
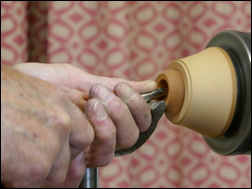
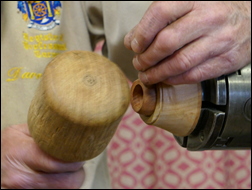
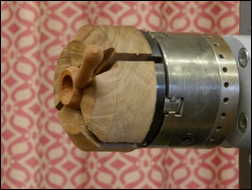
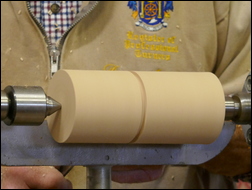
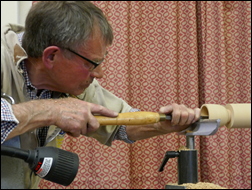
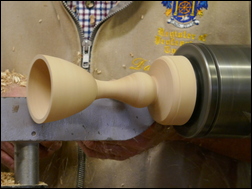
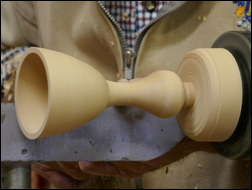
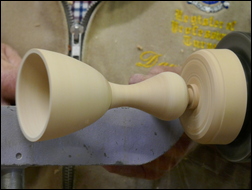
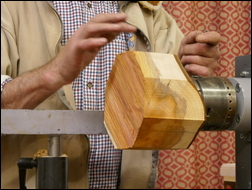
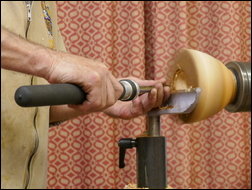
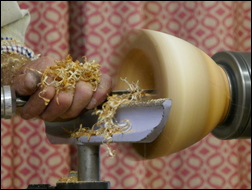
For the scoop Dave mounted a kiln dried Ash blank of approx. 7" long by 2.5" square section between a 4-prong drive and a live centre, after showing two ways of finding the blank end-centres quickly and without undue finesse. In this design the depth of the scoop would be the same as the width. Marking out was performed accordingly. The blank was roughed down to a cylinder and a deep parting (dimension-forming) cut was made at the point of bowl/handle intersection. The 'bowl' end was shaped quickly to roughly a goblet shape and the end point of the handle was defined to allow for a short spigot at the headstock end. The piece was then removed and the spigot was mounted in a chuck for the hollowing stage. After using a spindle gouge to make a central hole to the depth of the 'bowl' section of the scoop Dave concentrated on rapid hollowing of the cylinder with a bowl gouge and then included the use of an Ashley Iles scraper (from Tobias Kaye) to straighten the inside surface. He then used a spindle gouge to complete the outside shaping achieving an even wall thickness throughout by constant use of callipers. Action then moved to handle shaping, rounding off with sanding of all surfaces prior to parting off. Part of the hollowed section was then removed by saw followed by use of a chuck-mounted sanding disc to achieve a pleasing finished shape to the scoop section. (Note: In his workshop Dave would use a bandsaw rather than a hand saw).
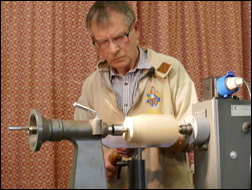
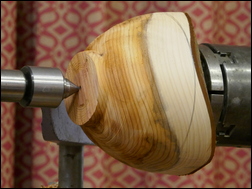
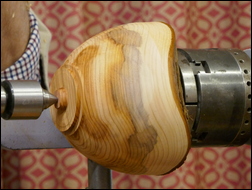
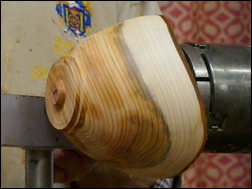
Natural-Edge-Bowl - After the break, while we were settling in our seats Dave could be observed (by those at the front anyway) to be drilling into the bark side of a chunk of Yew jammed between his feet using a Forstner bit, and seeming to the keen-eyed to be steering the drill off-line. When the blank (rough sawn 8-sided) was brought into full view it was observed to be a handsome example of this fine timber with never a crack to be seen, and with both sapwood and heartwood looking in fine condition. When asked the likely time since the tree was felled the answer was a surprising six years. Long expanding ('pin') jaws had been fitted to the selected chuck and the blank was mounted on these, with tailstock support. Dave explained that he had been influenced in the method he was about to demonstrate by the late (truly great) Bert Marsh. The object in this case was to achieve the best possible balance in the natural edge indentations at the rim. This then led into an explanation of the wonky drilling observed at the start. This technique (used with practice) permits jiggling of the blank at an appropriate point in the turning process to achieve the afore-mentioned balance. Use of a visor is essential in case bark flies off although the aim is to retain all bark if possible. In some instances unintentionally liberated sections of bark can be glued back into position satisfactorily with superglue but it must be allowed to dry thoroughly. Rounding the blank was started carefully from the tailstock end with a caution about the care needed to avoid 'going off the ragged edge' (his words). With rounding partly achieved from that end the direction of cut was then reversed to meet the point reached from the tailstock end. Shaping a curve towards the base of the bowl was commenced using pulling cuts whilst monitoring to decide the best appearance. It was decided at this point that although the balance was quite good it could be improved by moving the blank on the jaws as described above and this was done to perfection. The balance can be checked accurately by marking a pencil line. Dave underlined the point that balancing is a feature of excellence in design. A spigot for chuck mounting was then formed at the base followed (after contemplation) by the shaping of a foot (which would have a slightly concave base). Having moved the bowl on the chuck jaws it was now necessary to turn out the resulting slight wobble in the bowl shape and this was duly done with pulling cuts towards the bark line.
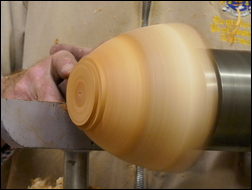
After detailed, careful work on perfecting the outside of the bowl the tail centre was removed and the spigot was faced (importantly) ready for reversing into gripping jaws. Dave made the point that at this stage the jaws should first be centred by winding them fully home before winding back out to the gripping diameter. Hollowing was carried out rapidly with the advice that the desired line should be picked up as soon as possible. Achieve an even wall thickness at the edge in particular. It becomes necessary to switch bowl gouges in the later stages of hollowing to one with say a 60° bevel to achieve a smooth flowing cut towards the middle.
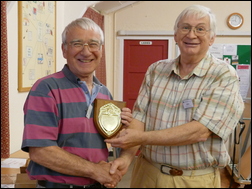
Then, all too abruptly 'the final whistle' came after about four minutes extra time and the proceedings were rounded off with a well-earned vote of thanks to Dave and applause for yet another masterly performance.
<Top of Page>
There are two Show and Tell Tables - both using the same Theme - with a table for Novice Category and one for the Open Category.
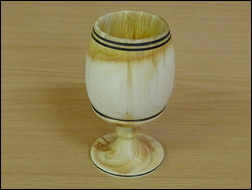
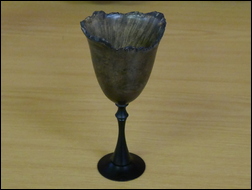
This months Show and Tell Theme was: A Goblet
| This month's winner in the Novice Category was Robert Duffy with a goblet in cherry |
 |
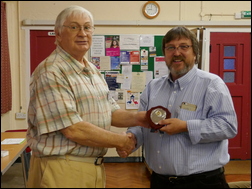 |
| The May winner of the Open Category was Arthur Kingdon with a stained acacia burr goblet with an African blackwood stem |
 |
 |